
Everything You Need to Know About Drywall Anchors: How to Hang Things Securely Without Studs
Trying to hang something (ie. a floating shelf) only to realize that the studs aren’t where you need them is a common DIY moment that most of us have experienced. The good news: you can mount a shelf securely in drywall—if you choose the right drywall anchors and install them properly.
In this guide, we’ll cover the most common drywall anchor types, what they’re best for, and the exact step-by-step process we used to hang a floating shelf bracket when no studs lined up. If you’ve been searching for the best drywall anchors for floating shelves, you’re in the right place.
*We feel that it’s important to note that we always recommend you try and find a solution that allows you to attach whatever you’re mounting directly into a stud (or some form of structural backing), before resorting to only using hollow wall anchors. This is the best way to ensure strong, lasting results.
Quick Steps (For the “Just Tell Me How” Crowd)
Find studs first with a stud finder (always aim to use a stud whenever possible).
If the shelf won’t hit studs, pick the strongest anchor that fits your bracket holes.
Mark centre + height using painter’s tape, then level your bracket and mark holes (refer to shelf installation manual to determine which holes).
Pre-drill starter holes for accuracy (even with self-drilling anchors).
Install anchors (often best with a manual screwdriver, per package directions).
Clear drywall debris so anchors sit flush (can be important with flush shelves).
Mount bracket, level again, then tighten until the anchor fully engages.
Install the shelf.
Why Studs Matter (and When it’s OK Skip Them)

The reason we use hollow-wall anchors (rather than just screwing directly into the drywall) is to increase the holding power of drywall by spreading the load over a larger area. A screw by itself only pulls against the drywall’s paper surface, which makes it easy for the weight to tear straight through. Anchors fix this by expanding, gripping, or clamping behind the wall, creating a broad footprint that distributes the force across more of the drywall. Some anchors even squeeze the drywall between two metal surfaces, adding friction and stability. All of this turns drywall—normally a weak material—into a more reliable mechanical system that can safely carry much heavier loads.
Having said that, anchors have their limitations- and are ultimately only as strong as the drywall they’re ‘anchored’ in. So when is it oK to solely rely on anchors, and when do you need to attach what ever you’re mounting to some form of structure (ie. a stud)?
Generally speaking, for anything that could be considered heavy (think ~20lbs and up), or anything that has what’s known as a dynamic load- where the weight of the object changes due to movement, vibration or impact (like a TV on an adjustable mounting bracket) —a stud is the best anchor point. Our general rule of thumb is: if it’s heavy or it moves- tie it into structure. If what you’re mounting is a static load, so long as the load limit listed on the anchors exceeds the weight of the item you’re mounting, theoretically you should be able to rely solely on hollow wall anchors- but in our opinion, the heavier the item, the less confident we would be in doing so.
OK, Sounds Like I Need a Stud. How Do I Find One?
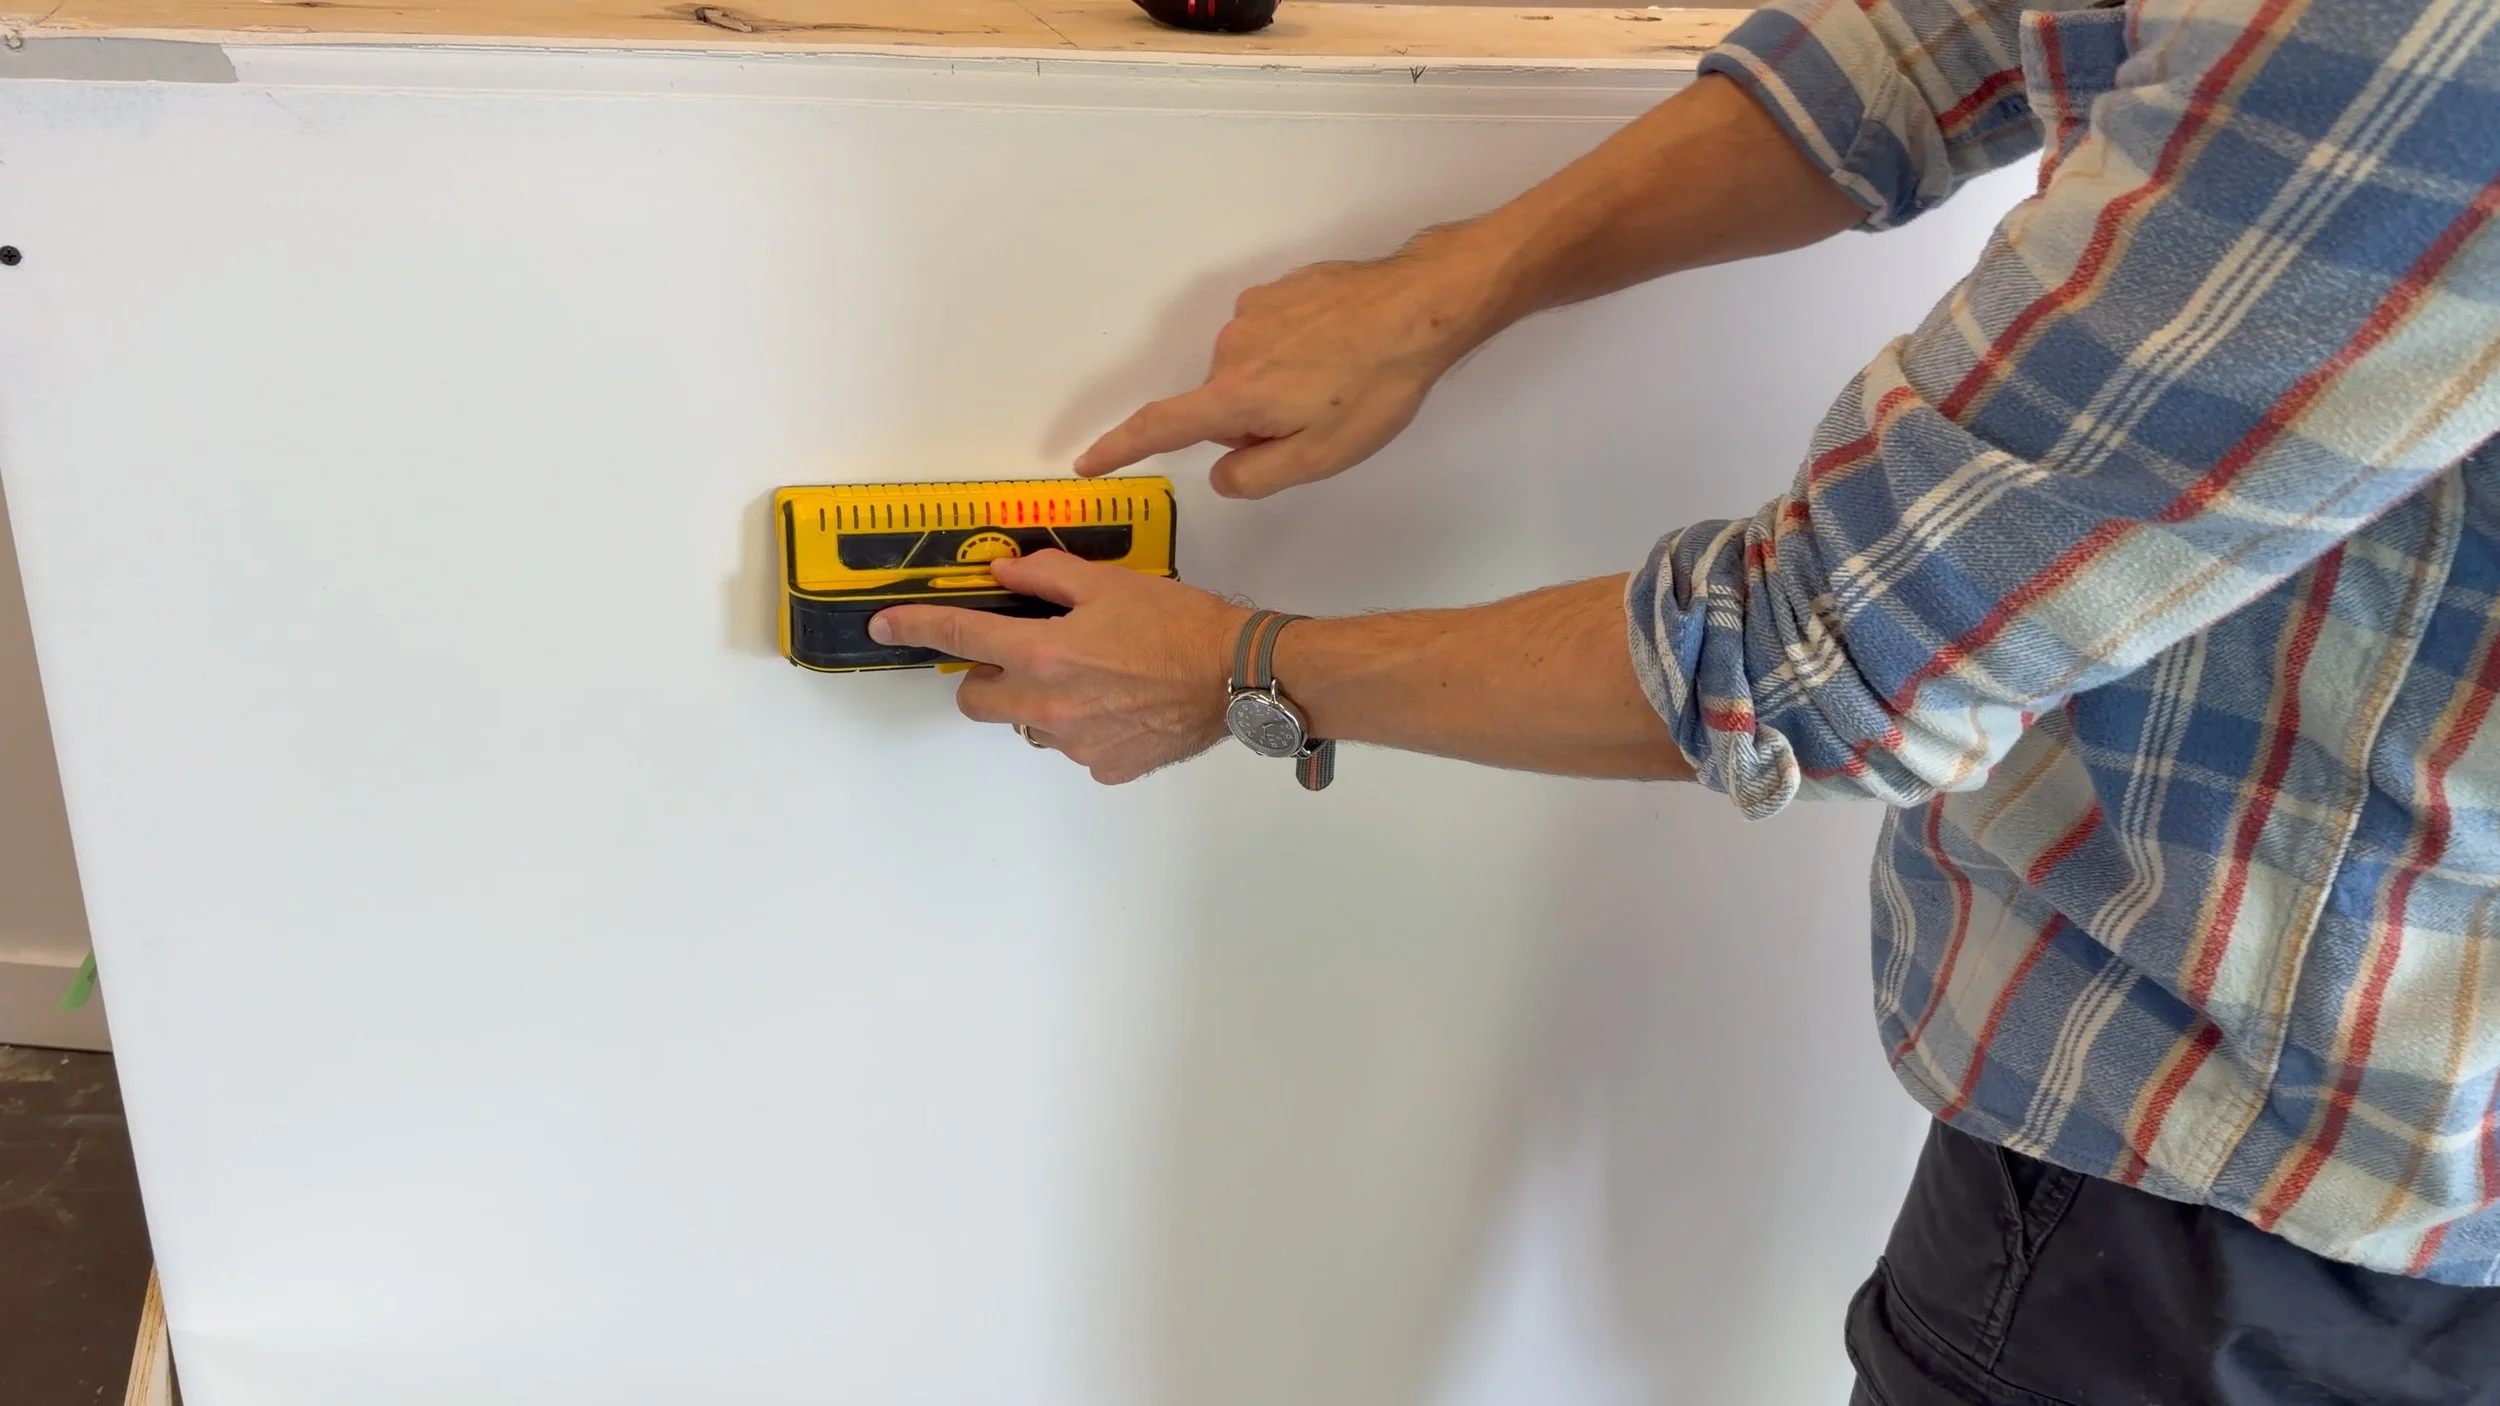
In most cases, standard stud spacing is every 16 inches on centre (this just means the centre of each stud will be 16 inches apart), but 24 inches on centre is also common. Unfortunately, this isn’t always the case- and since you can’t just eyeball them—use a stud finder and mark locations before drilling.
What To Do If The Studs Don’t Line Up
If what you’re mounting, or where you’re mounting it, doesn’t line up with the stud placement (common when trying to ‘centre’ something on a wall) you’ve essentially got two options:
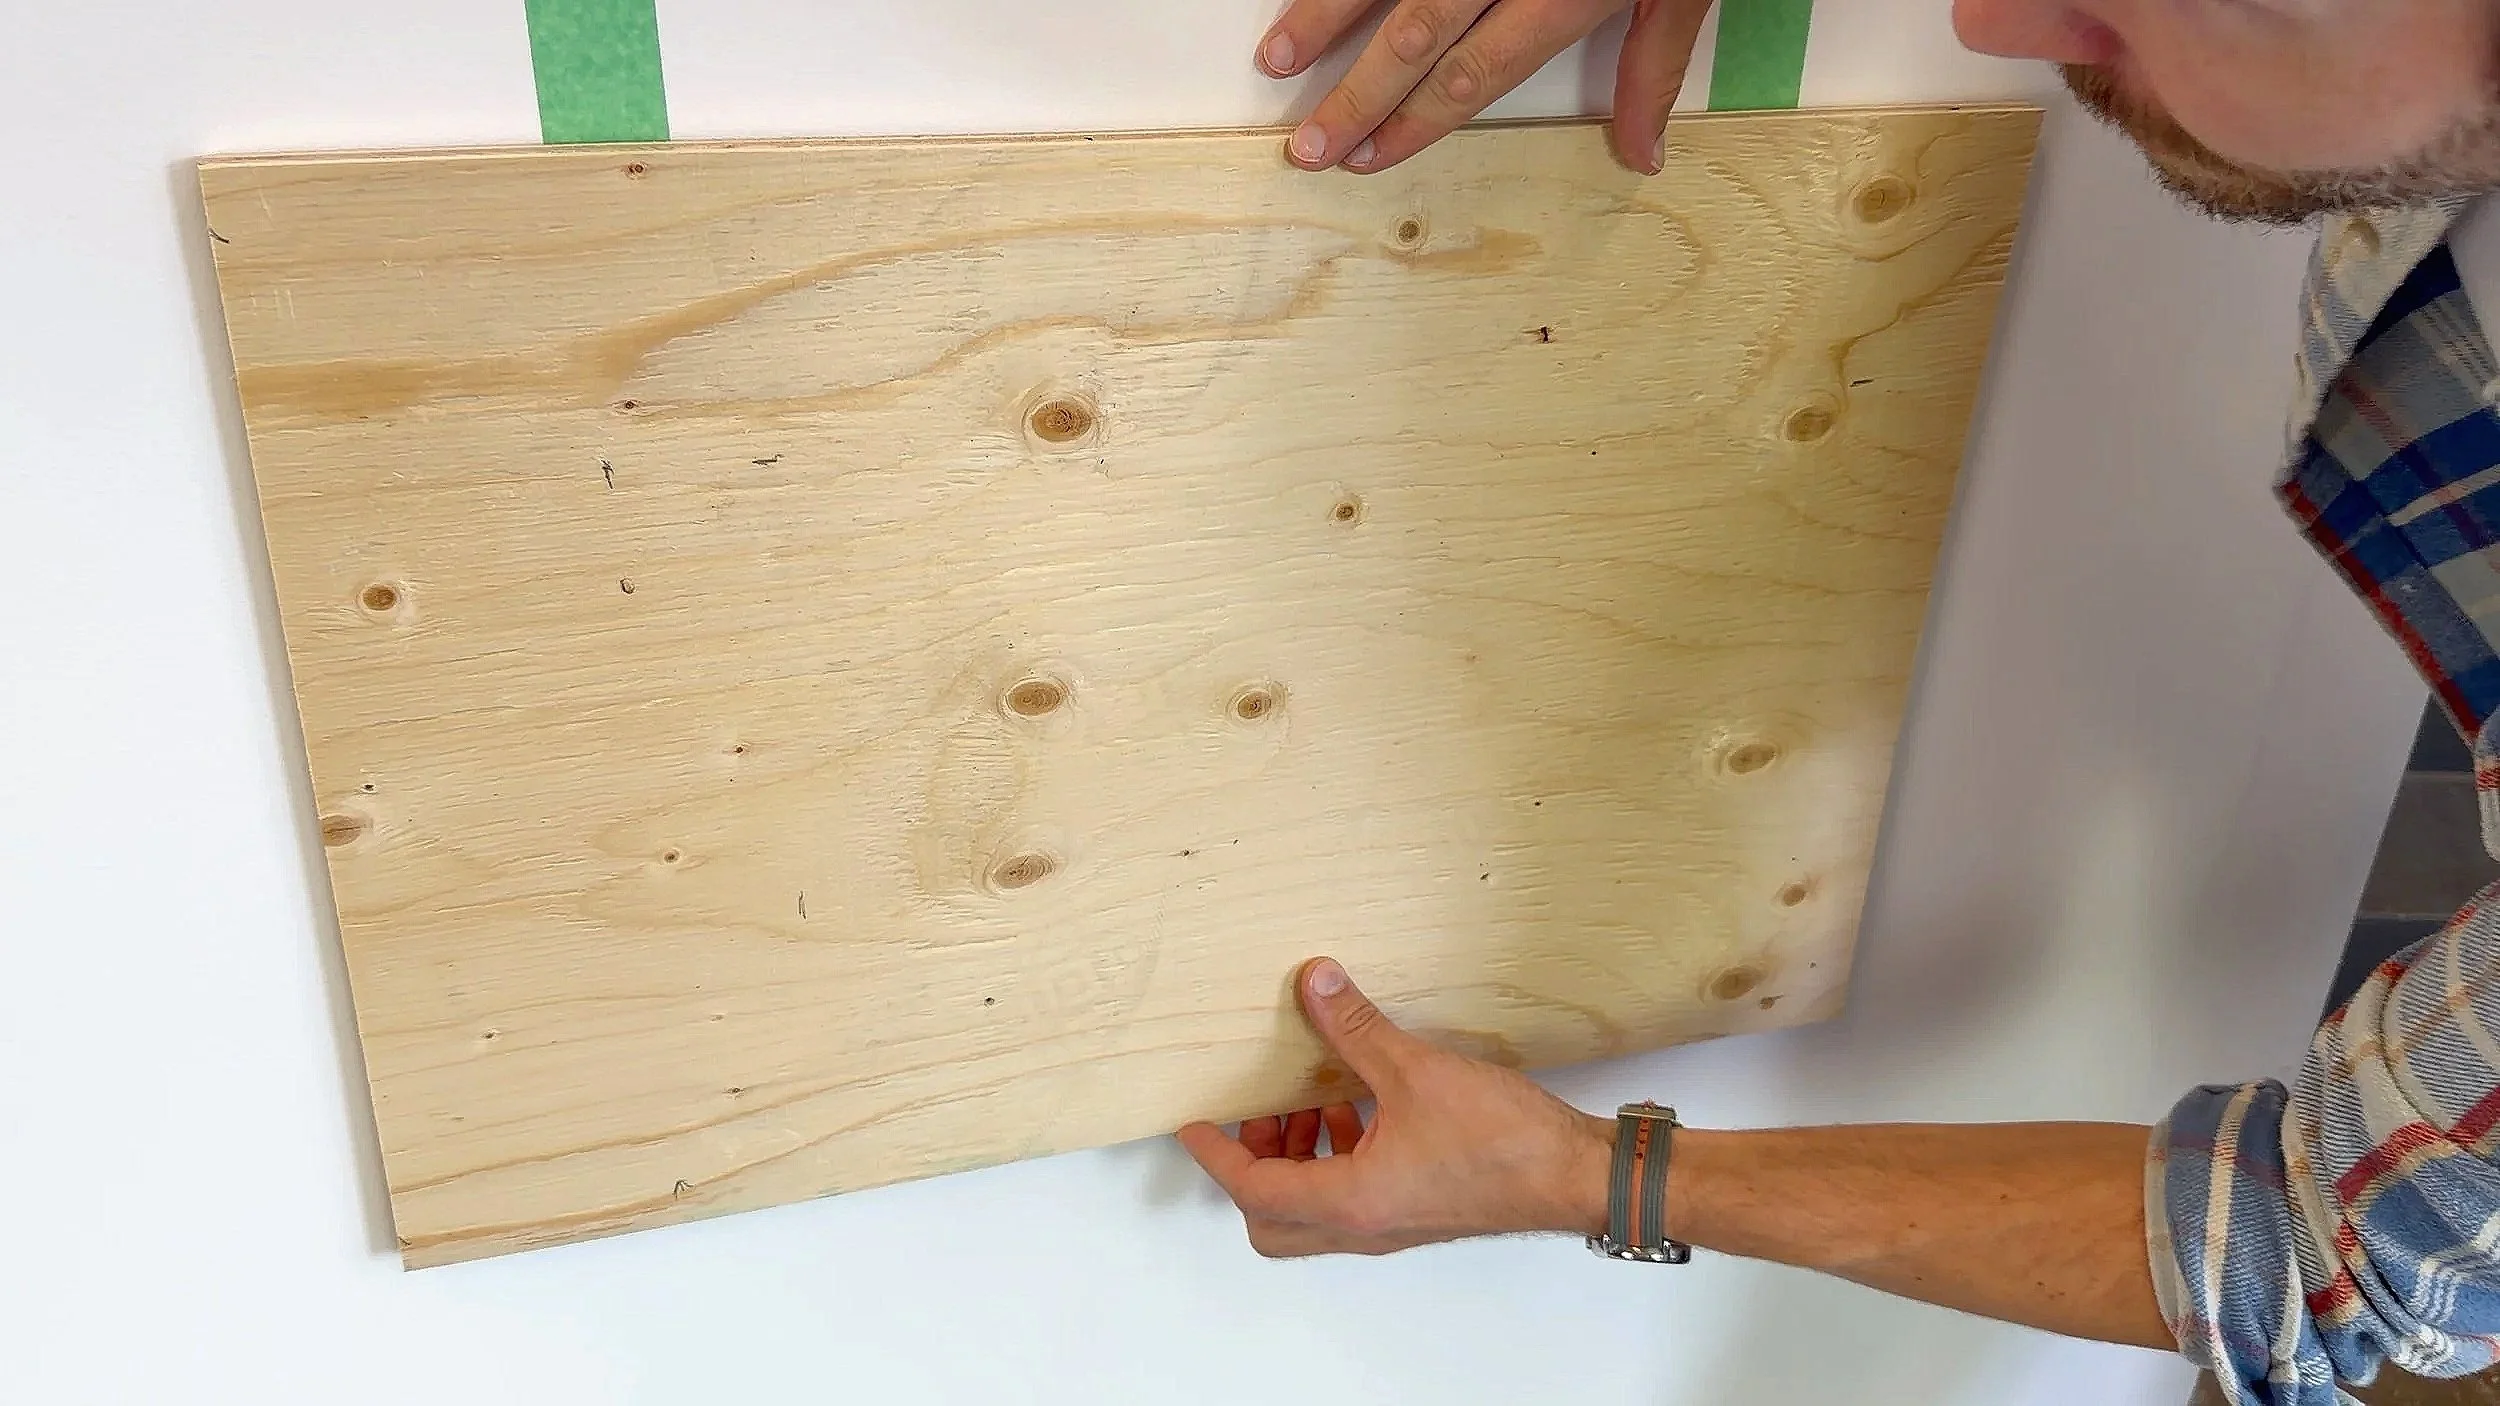
Add backing (best for heavy loads): screw a piece of plywood into studs, then mount your shelf anywhere on the plywood.
Use heavy-duty hollow wall anchors: when backing isn’t an option, use drywall anchors designed for hollow walls—and use them correctly.
The 3 Main Types of Drywall Anchors (And What They’re Best For)
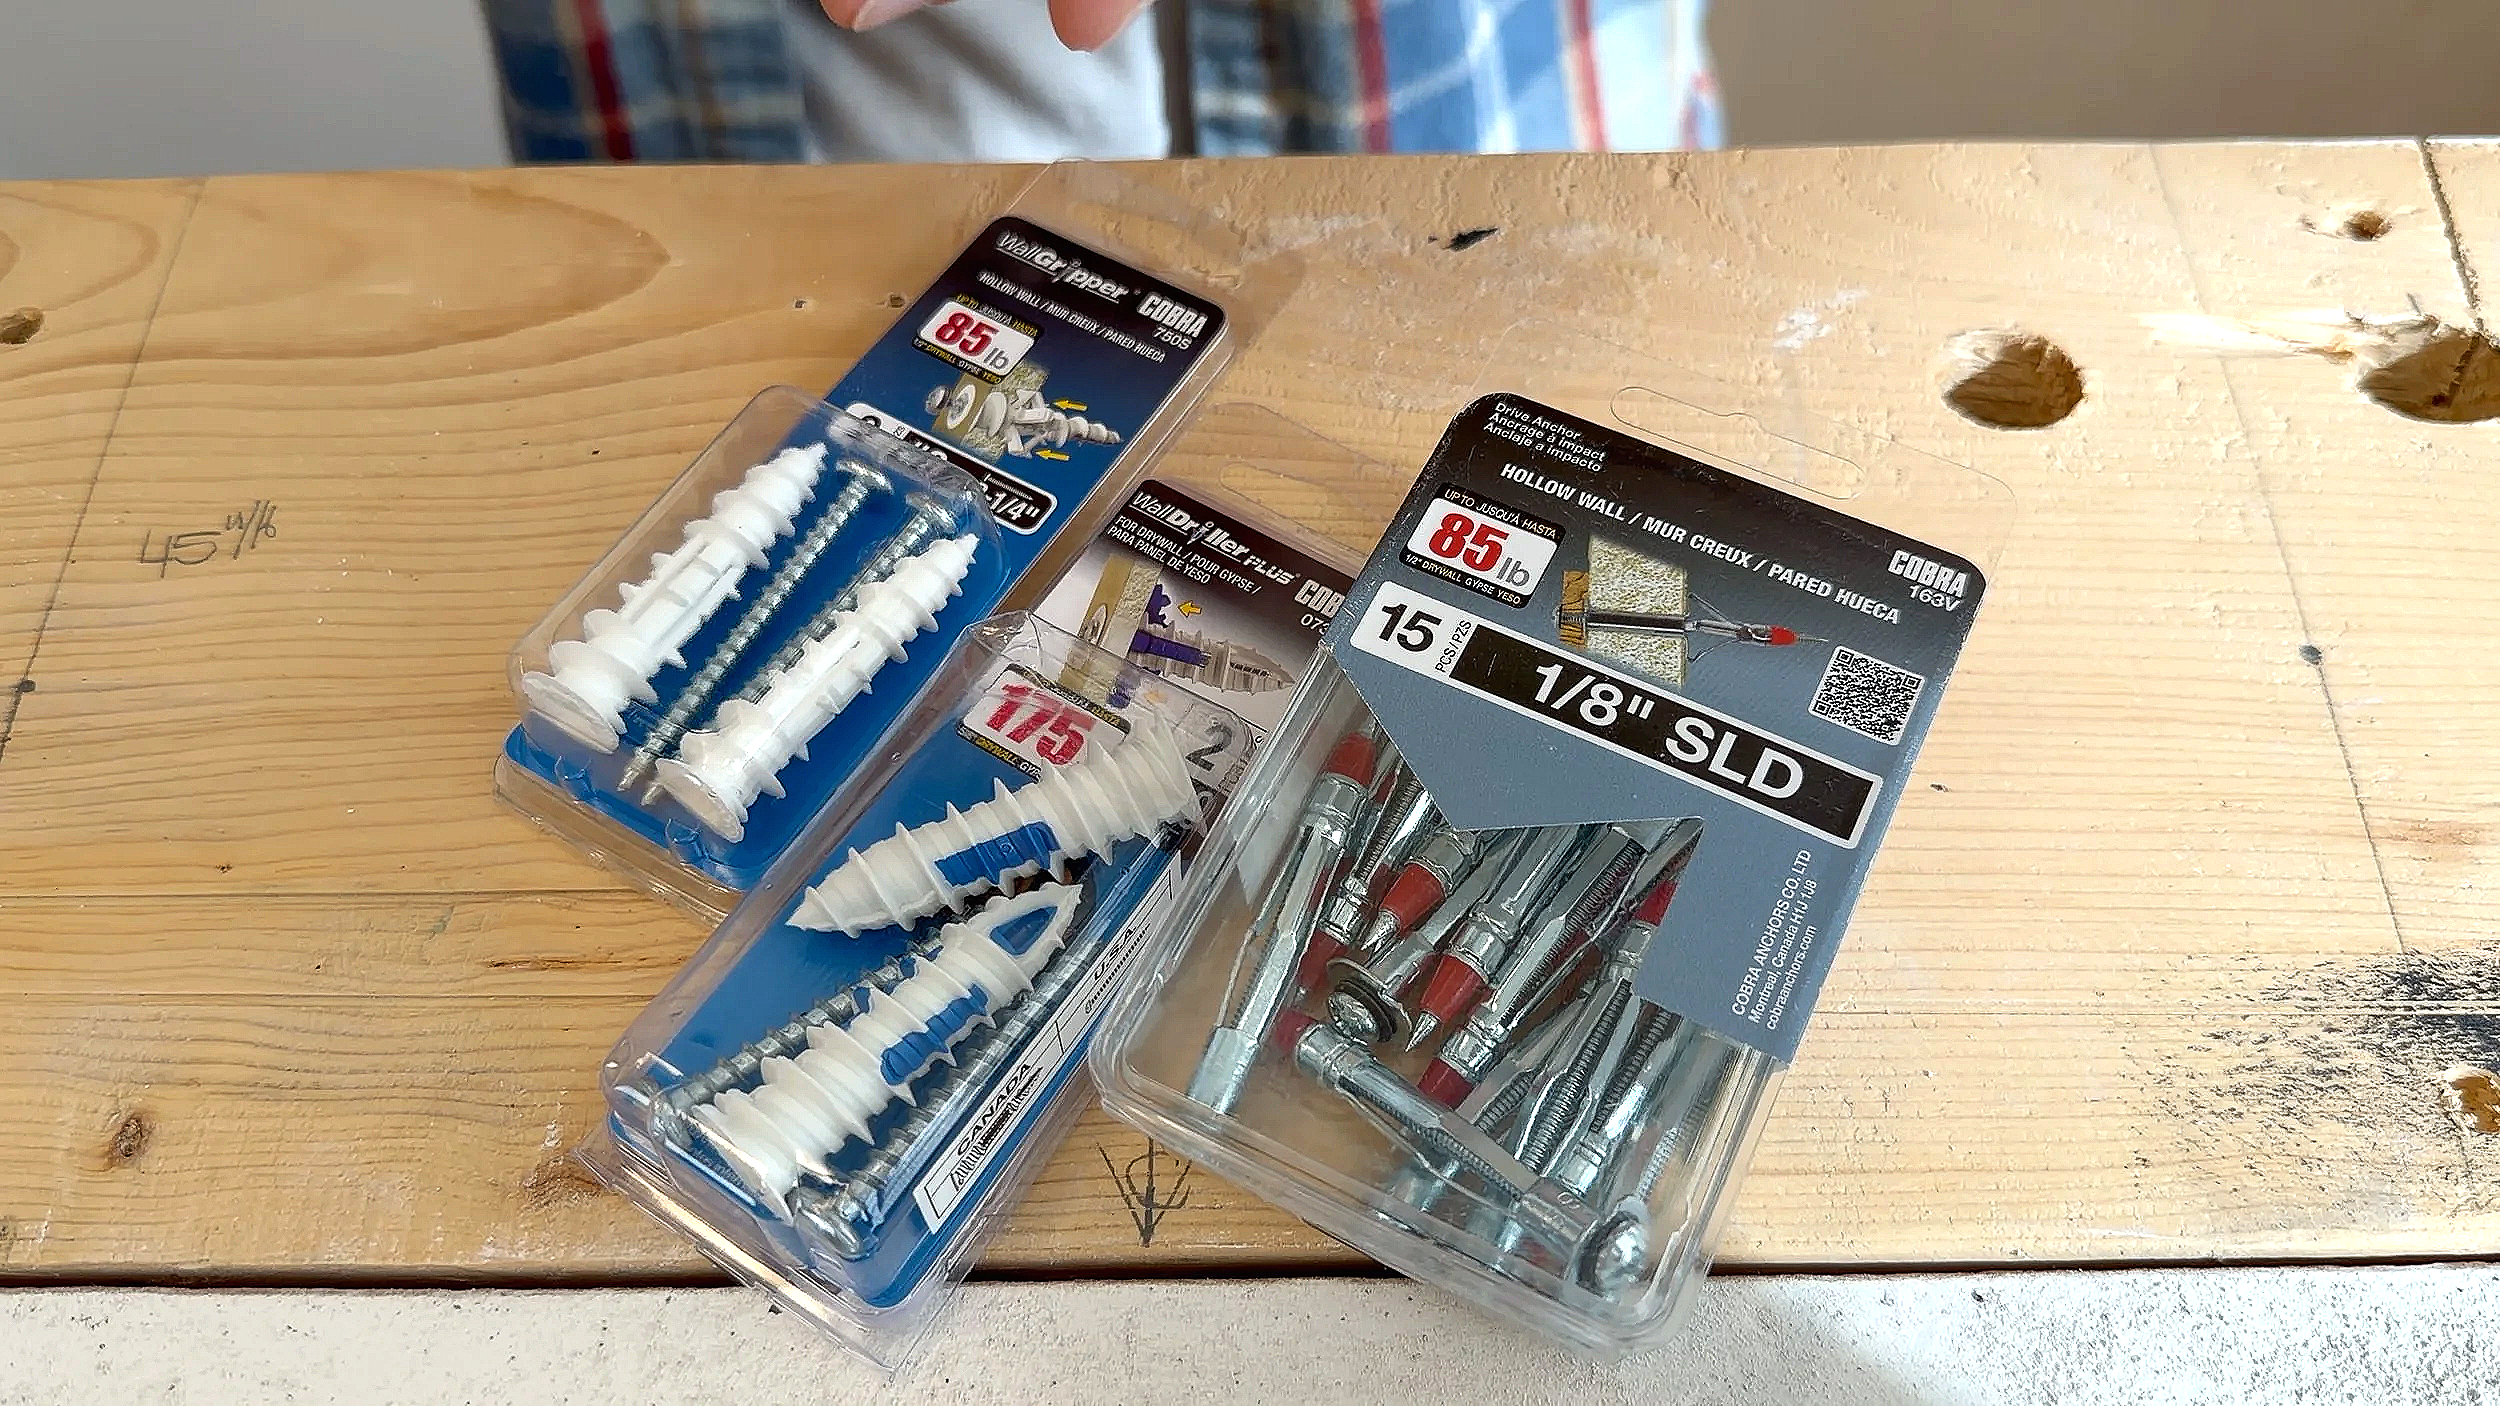
Most anchor packages list their weight ratings (usually based on a single pull test) . That helps—but what really matters is how the anchor holds inside drywall. Other factors that impact hollow wall anchors effectiveness are the thickness of the drywall (5/8” will hold an anchor better than 1/2” drywall) and the gauge (diameter thickness) of the screw/bolt used in conjunction with the anchor- but thats getting into the weeds a little more than we need to for the sake of this article. To make it easier, we like to break hollow wall anchors down into three basic categories:
1) Light-Duty Drywall Anchors (Plastic plugs & basic expansion anchors)
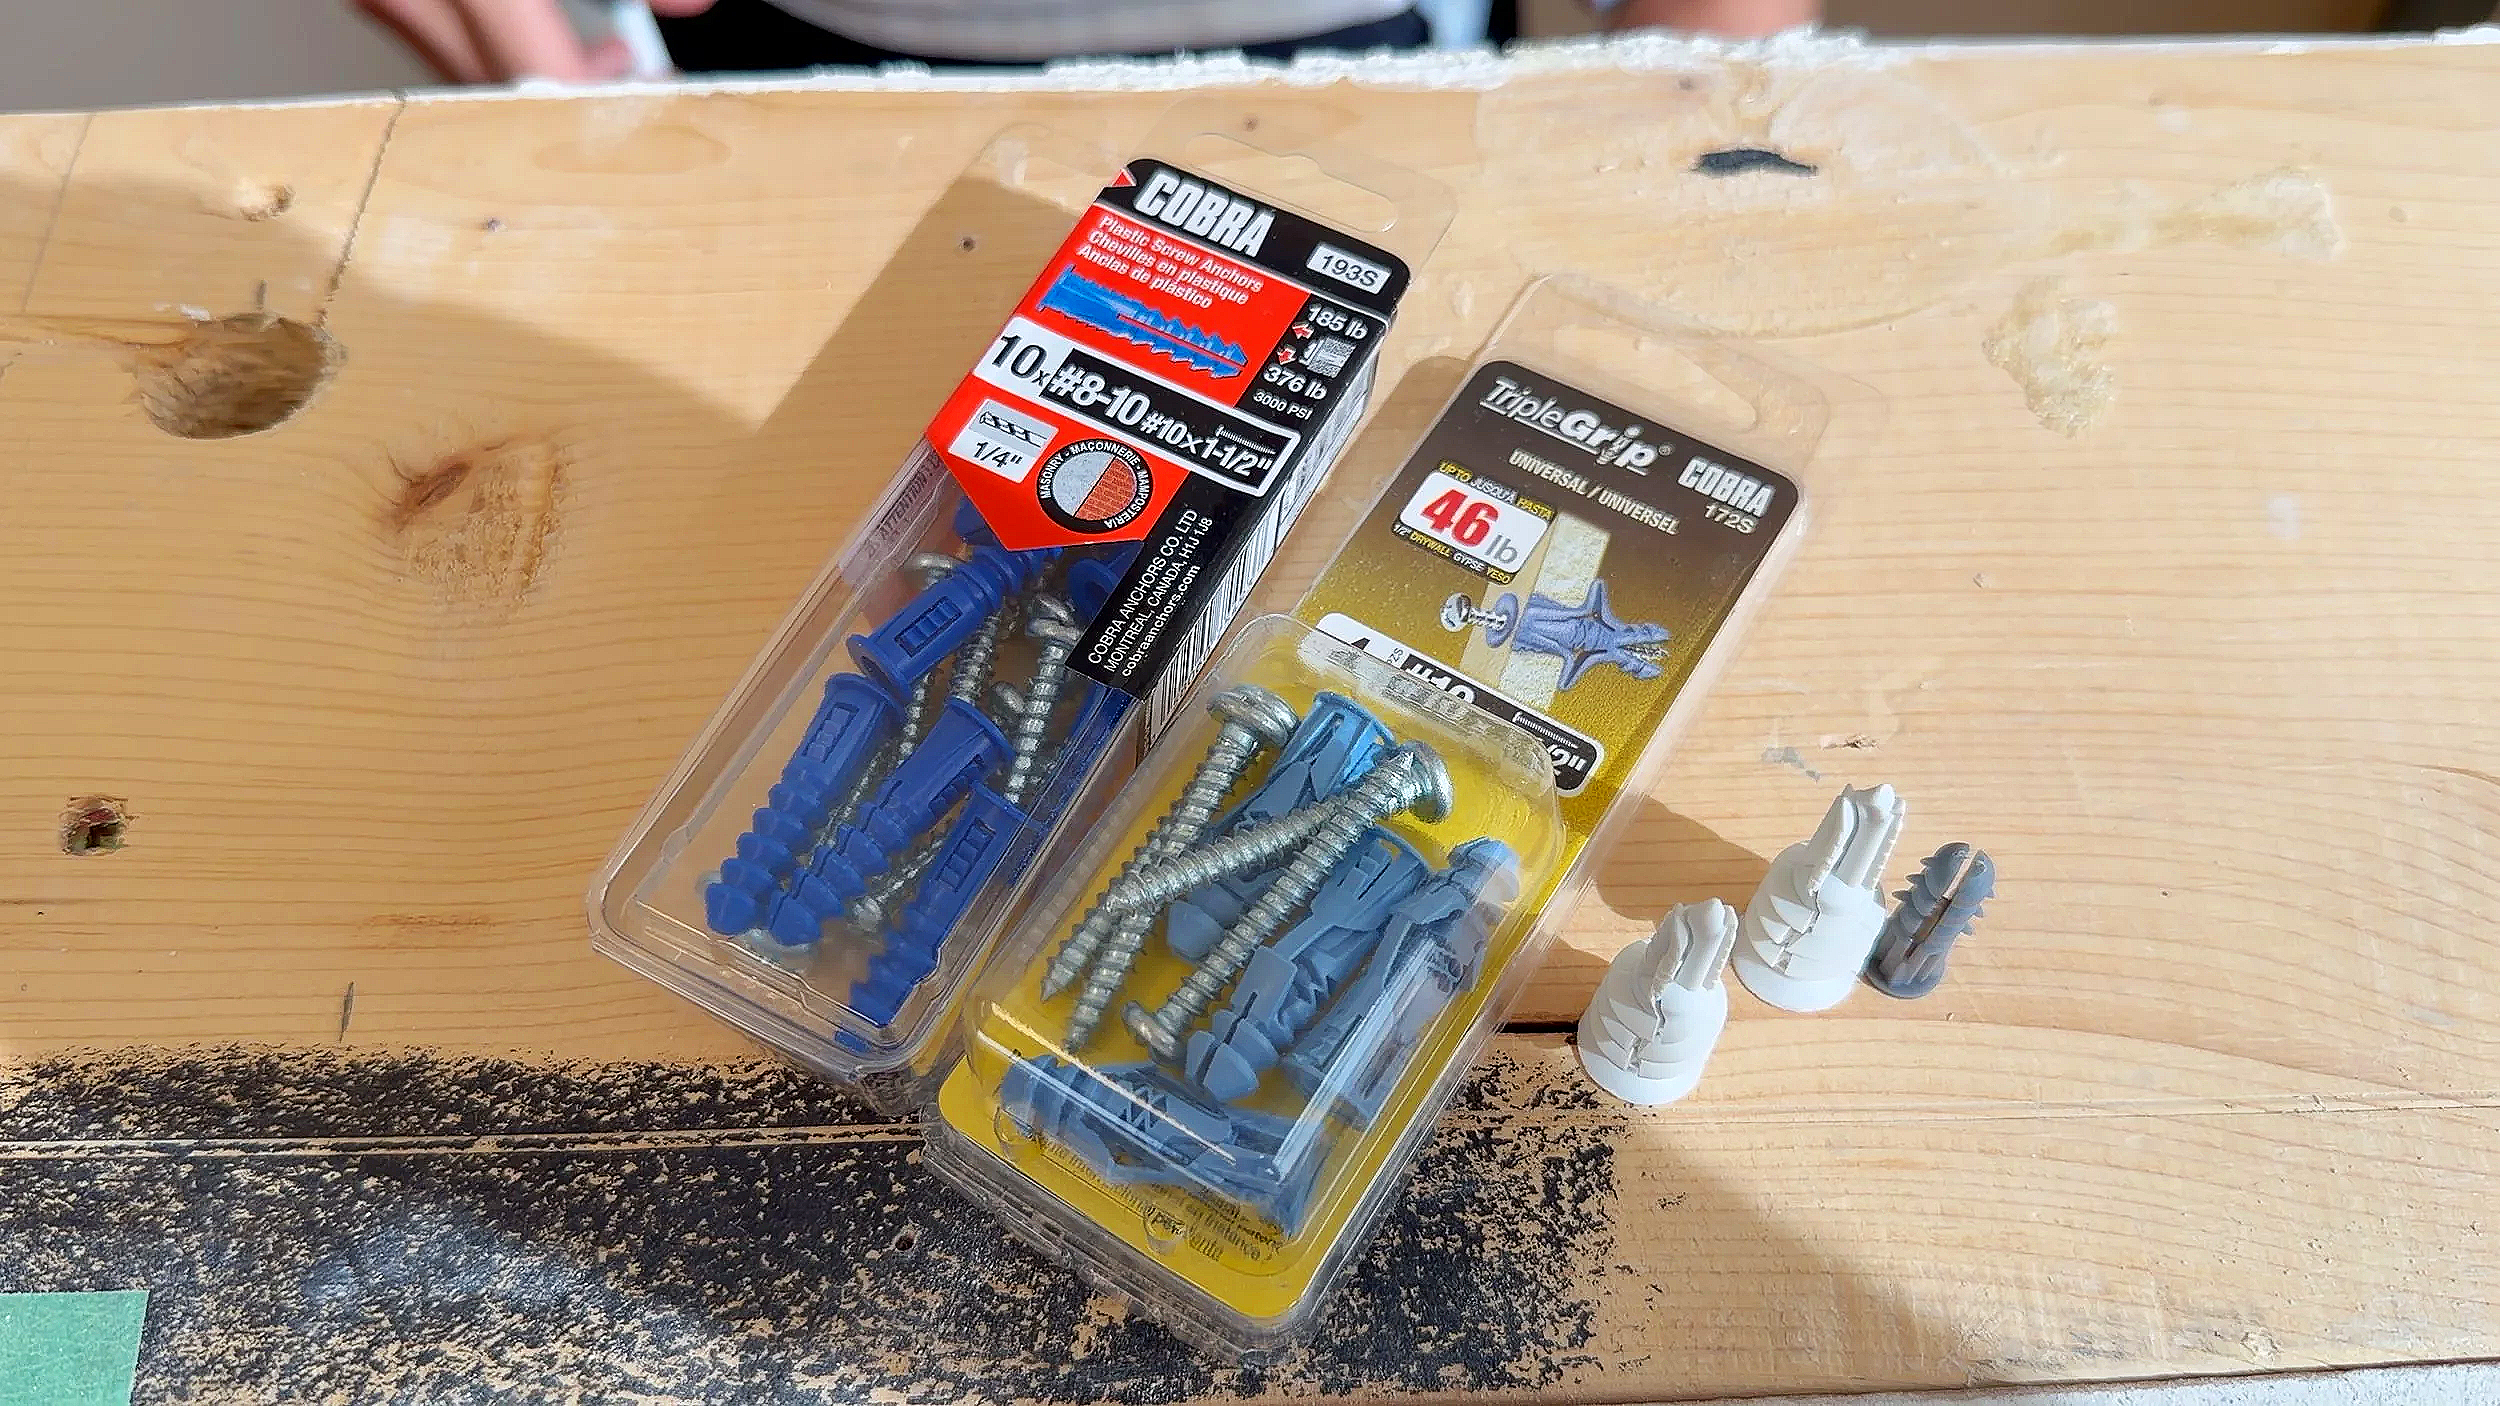
These work by expanding slightly when a screw is inserted, giving the anchor better holding power. When the screw is driven into the plug, the threads force the plastic to expand outward, pressing tightly against the drywall’s gypsum and both layers of paper. That outward pressure creates friction and spreads the load over a bigger surface area, which increases the holding power
Best for: small, light, static items (tiny frames, light decor)
Not for: heavy items, ie. floating shelves, TVs, etc.
Common failure: easily pulled out.
2) Medium-Duty Drywall Anchors (Expanding-wing styles, Molly/drive anchors etc.)
These anchors gain strength by expanding some form of mechanical wings/arms behind the drywall to help spread the point load over a larger area. When the screw is driven into the anchor, the threads force the wings/arms to open and extend outward, clamping against the back side of the drywall as the anchor is tightened.
Examples:
Molly / drive anchors: metal body collapses and “mushrooms” behind drywall.
Wing/leg expansion anchors: self drilling anchors that have wings that spread out when the screw is tightened.
Plastic Toggle Anchors: Wings are initially ‘pinched’ allowing the anchor to be inserted in the drywall, then spread open as a screw is inserted.
Best for: heavier, mostly stationary loads (many shelves, towel bars, fixtures)
Key detail: some designs require extra tightening to fully activate the wings/legs—stop too early and you don’t get full strength.
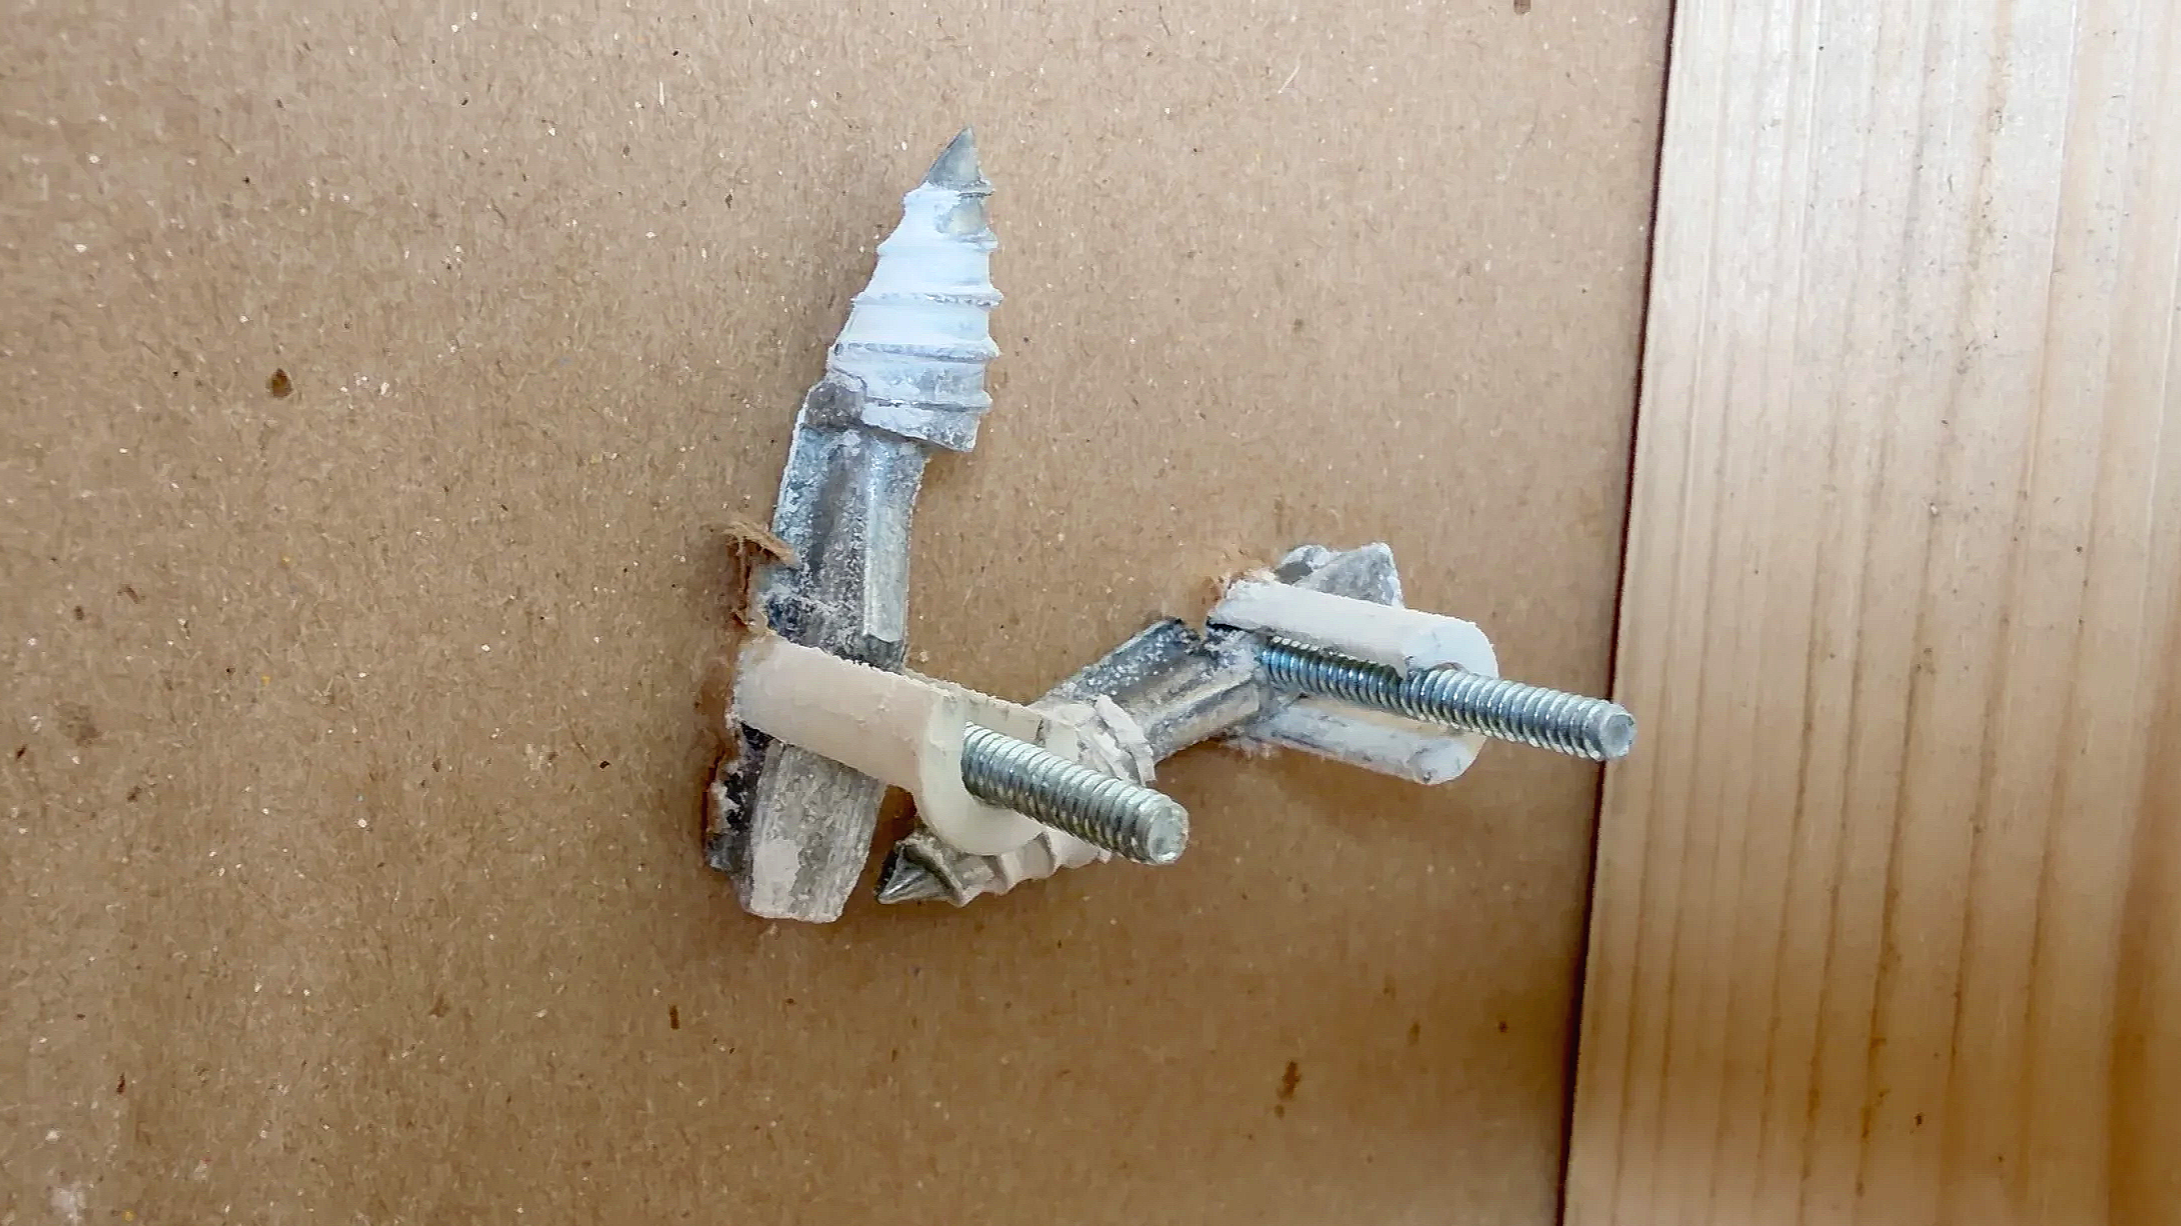
3) Heavy-Duty Drywall Anchors (Toggle anchors / flip toggles / toggle bolts)
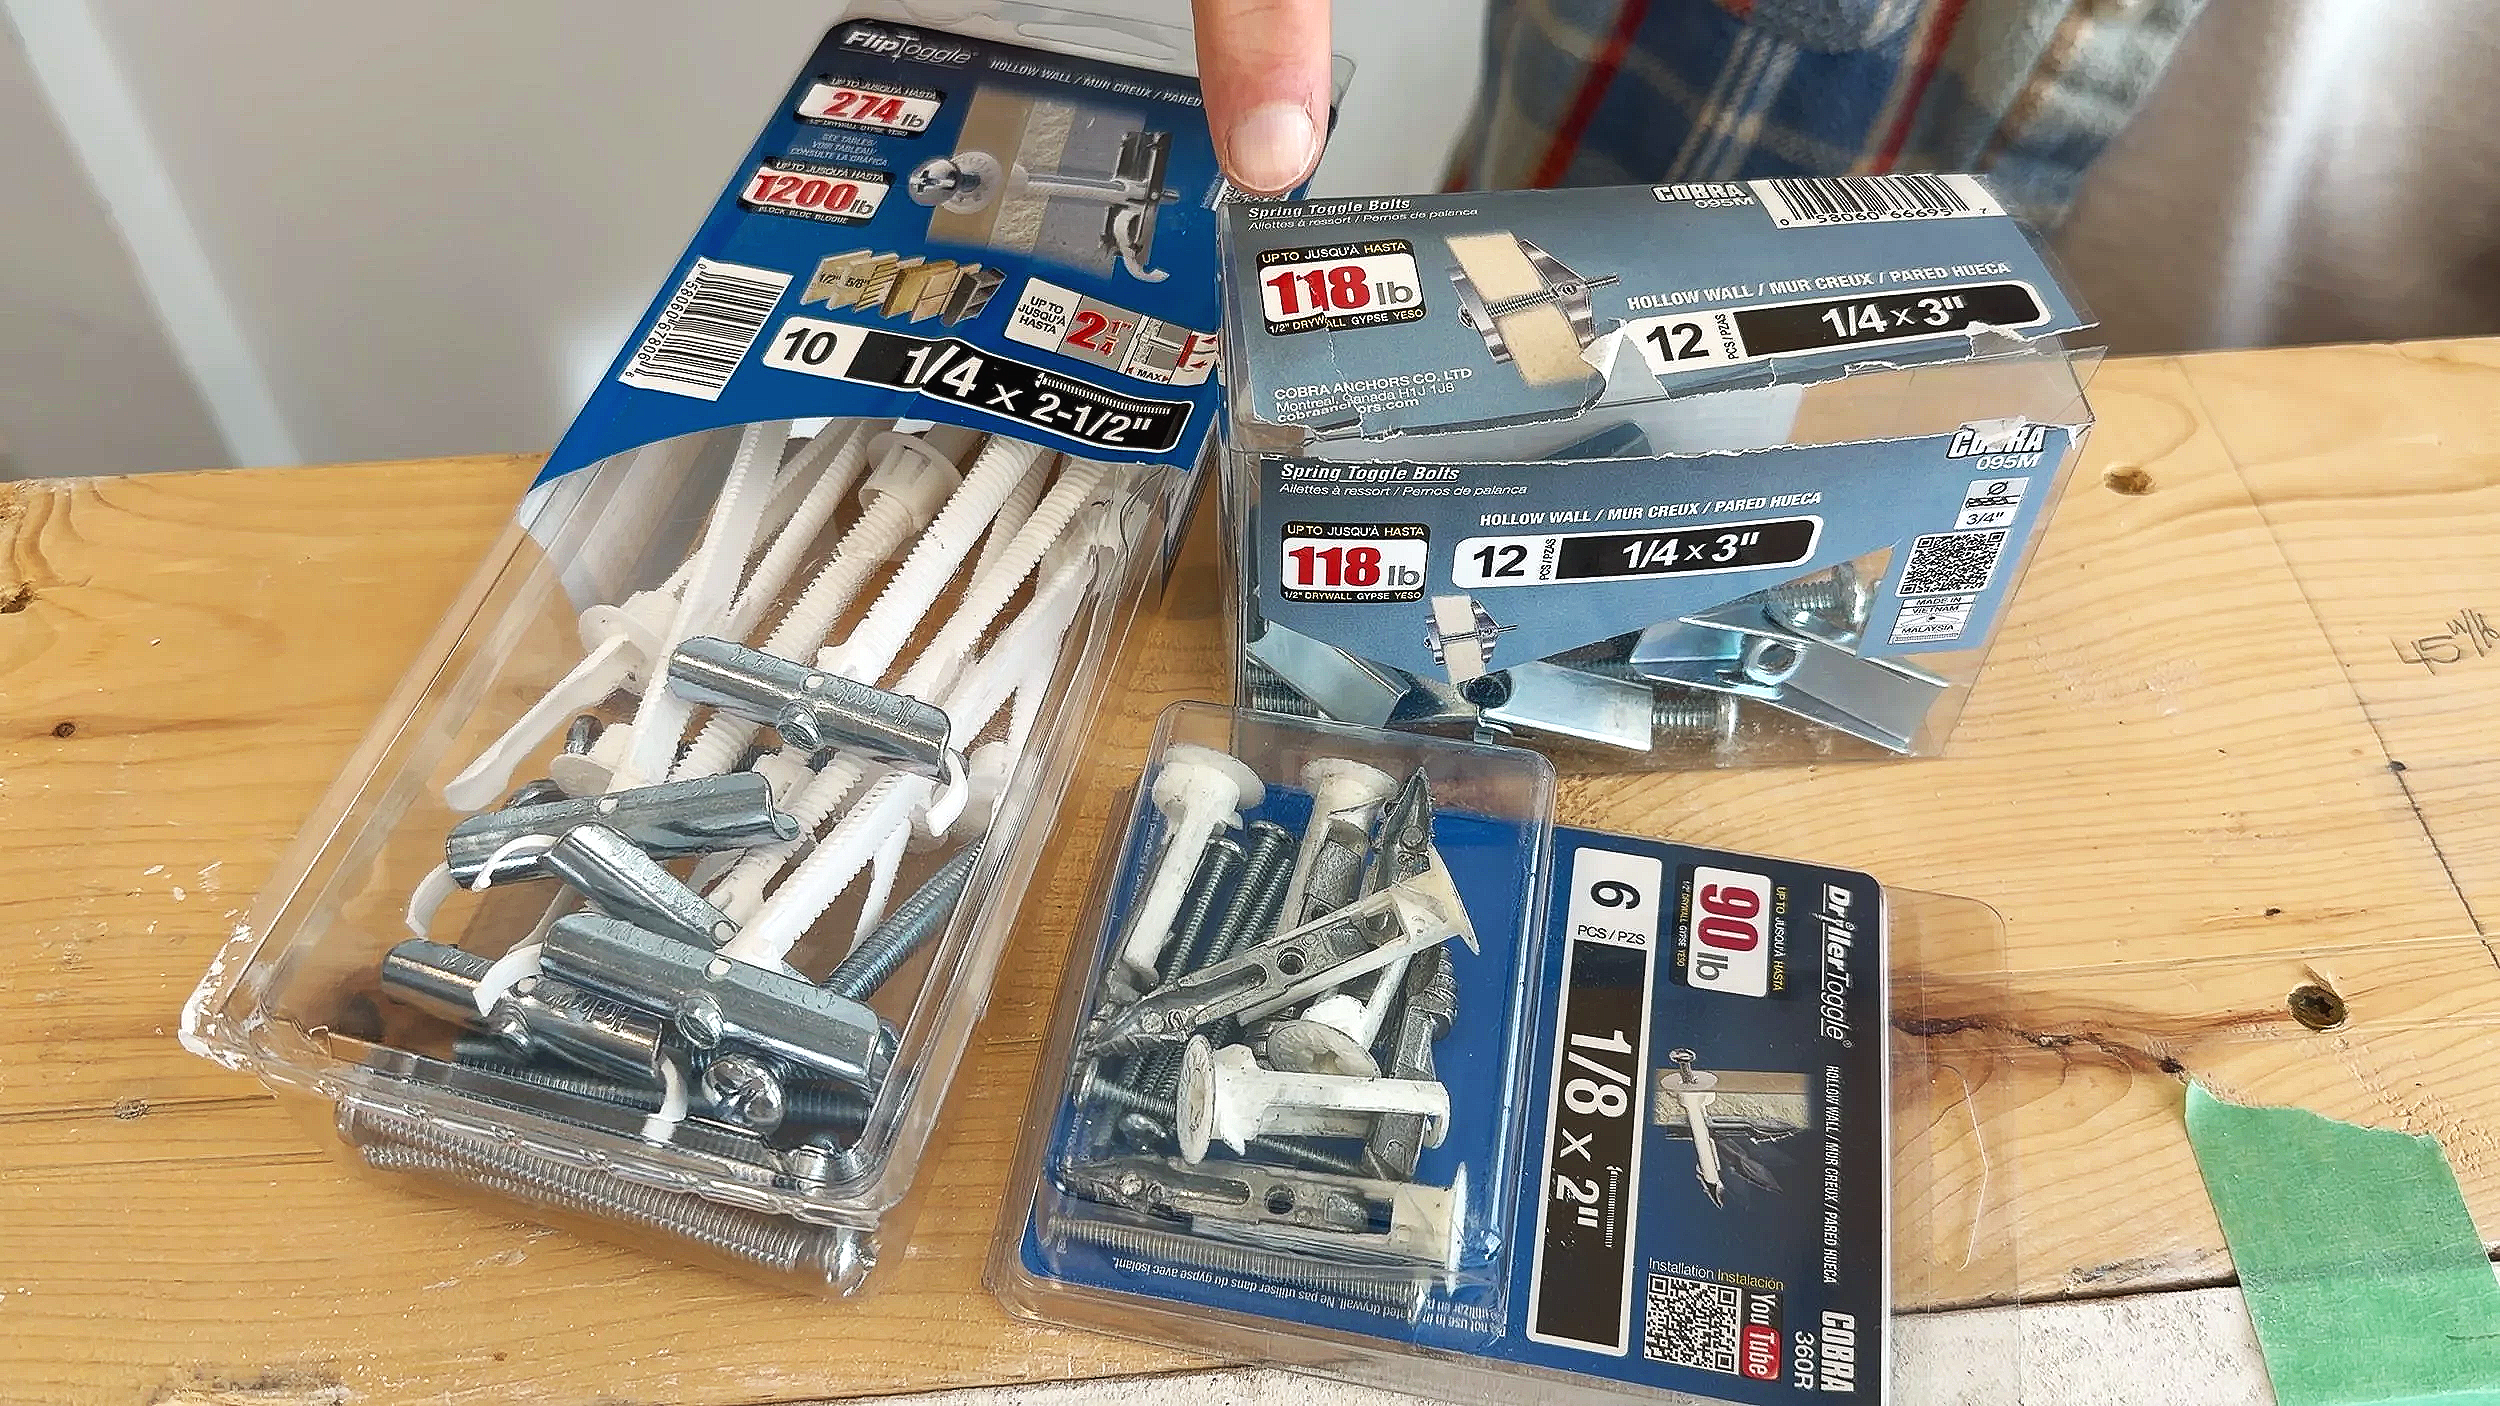
This is the strongest category because these anchors create a brace behind the drywall—like clamping the wall from the back side. These bracing brackets are usually much larger than the ‘wings’ that other anchors provide, which allow the load to be spread over a wider area, providing significantly more holding power. These anchors usually only fail when the drywall itself breaks.
Examples:
Self-drilling toggle bolts (hybrid): self-drills, then toggles/clamps when the bolt is inserted
Flip toggles: spring loaded wing/bracket anchors. High load capacity, but require a larger hole for the spring loaded brackets to fit through.
Snaptoggles: a metal bracket is inserted through a hole in the drywall, then flips flat behind the wall to create a wide brace.
Best for: maximum strength jobs
Tradeoff: Have to use the supplied bolts (doesn’t always fit the hardware you’re using).
How to Choose the Best Drywall Anchor for Your Project:
In our video, we demonstrated how to hang a floating shelf in a situation where there are no studs available. We’ll outline the logic we used to select which hollow-wall anchors to use. These basic steps should apply to most projects:
Always aim for the highest load capacity you can. Shelves get bumped, leaned on, and loaded. Better to be safe than sorry.
Check your hardware/bracket first. The pre-drilled hole-size can be limiting. This is where people mess up—your bracket may limit you.
Compare load limits of different anchors, and pick the strongest anchor (with screws/bolts that fit your bracket holes). This might mean going from a number 10 (thicker) to a number 8 (thinner) gauge bolt in the same style anchor, or switching anchors completely.
In our floating shelf example:
Our top-choice anchors (Snaptogglers) didn’t fit because the bolts were too big.
A heavy-duty toggle-style anchor that did fit the bracket became the best choice: maximum strength with compatible hardware.
How to Install Drywall Anchors for a Floating Shelf (Step-by-Step)
Tools you’ll want
Painter’s tape (for clean marking)
Tape measure
Level
Pencil
Drill + bit (for pre-drilling)
Manual screwdriver (often recommended for anchors)
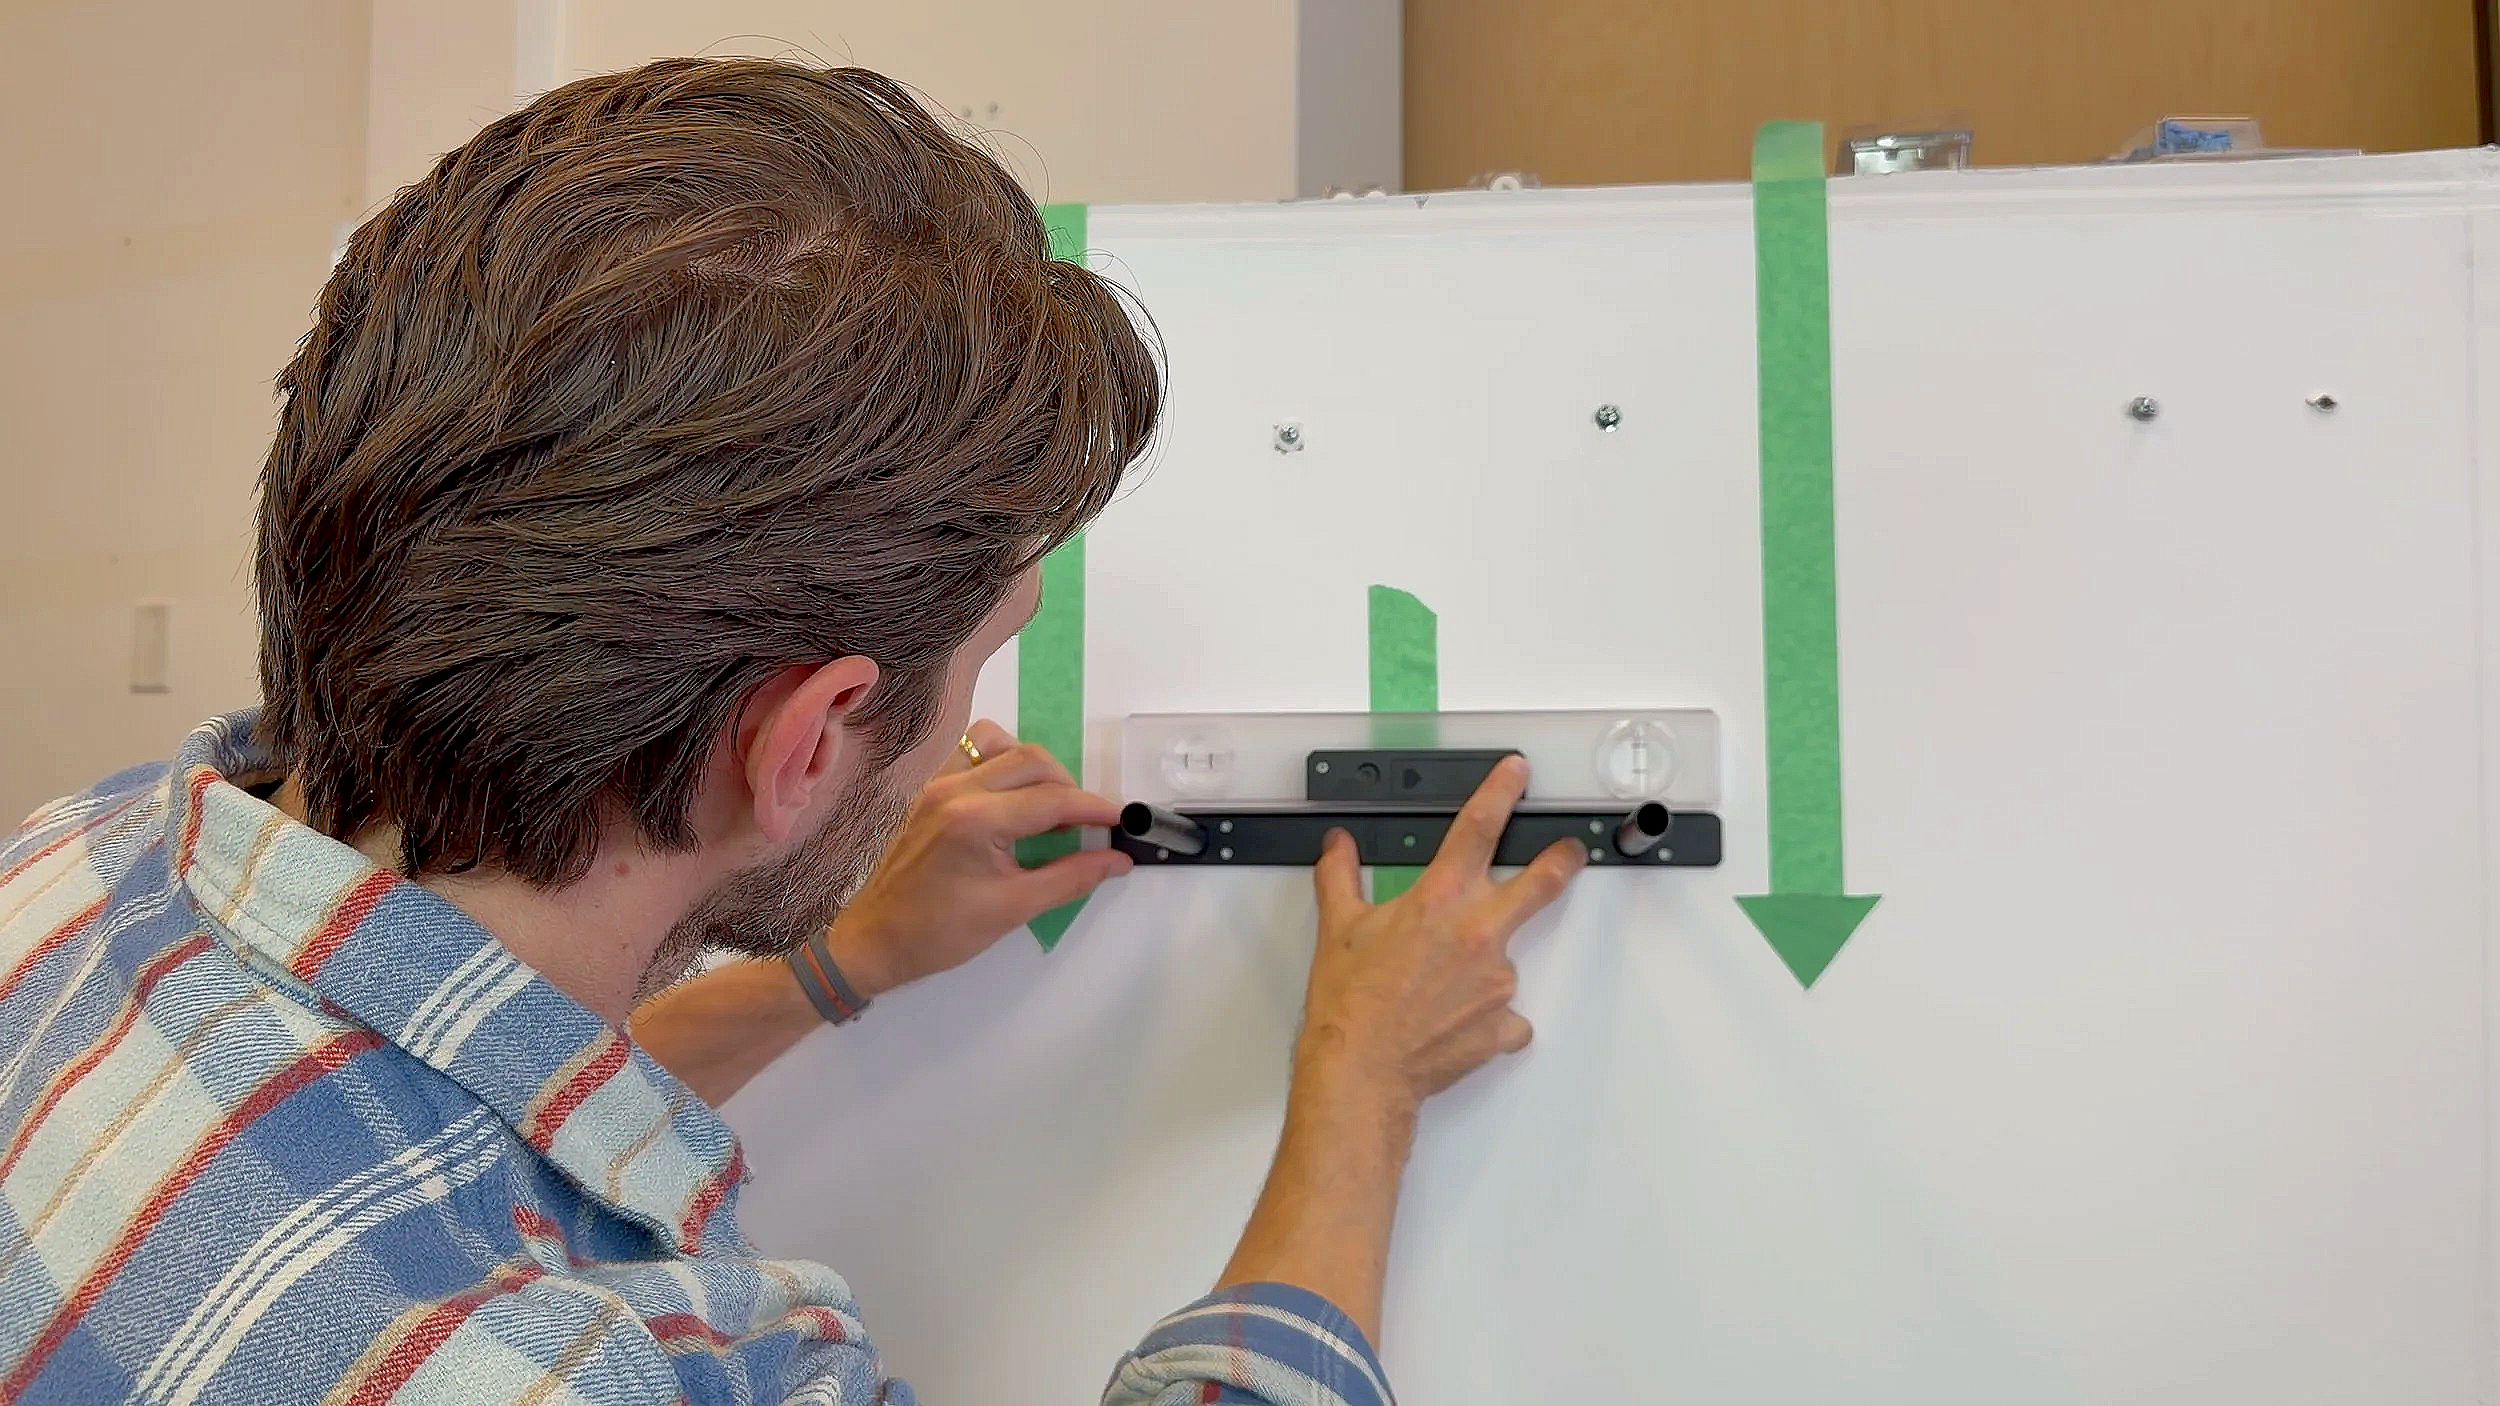
Step 1: Mark the center and height
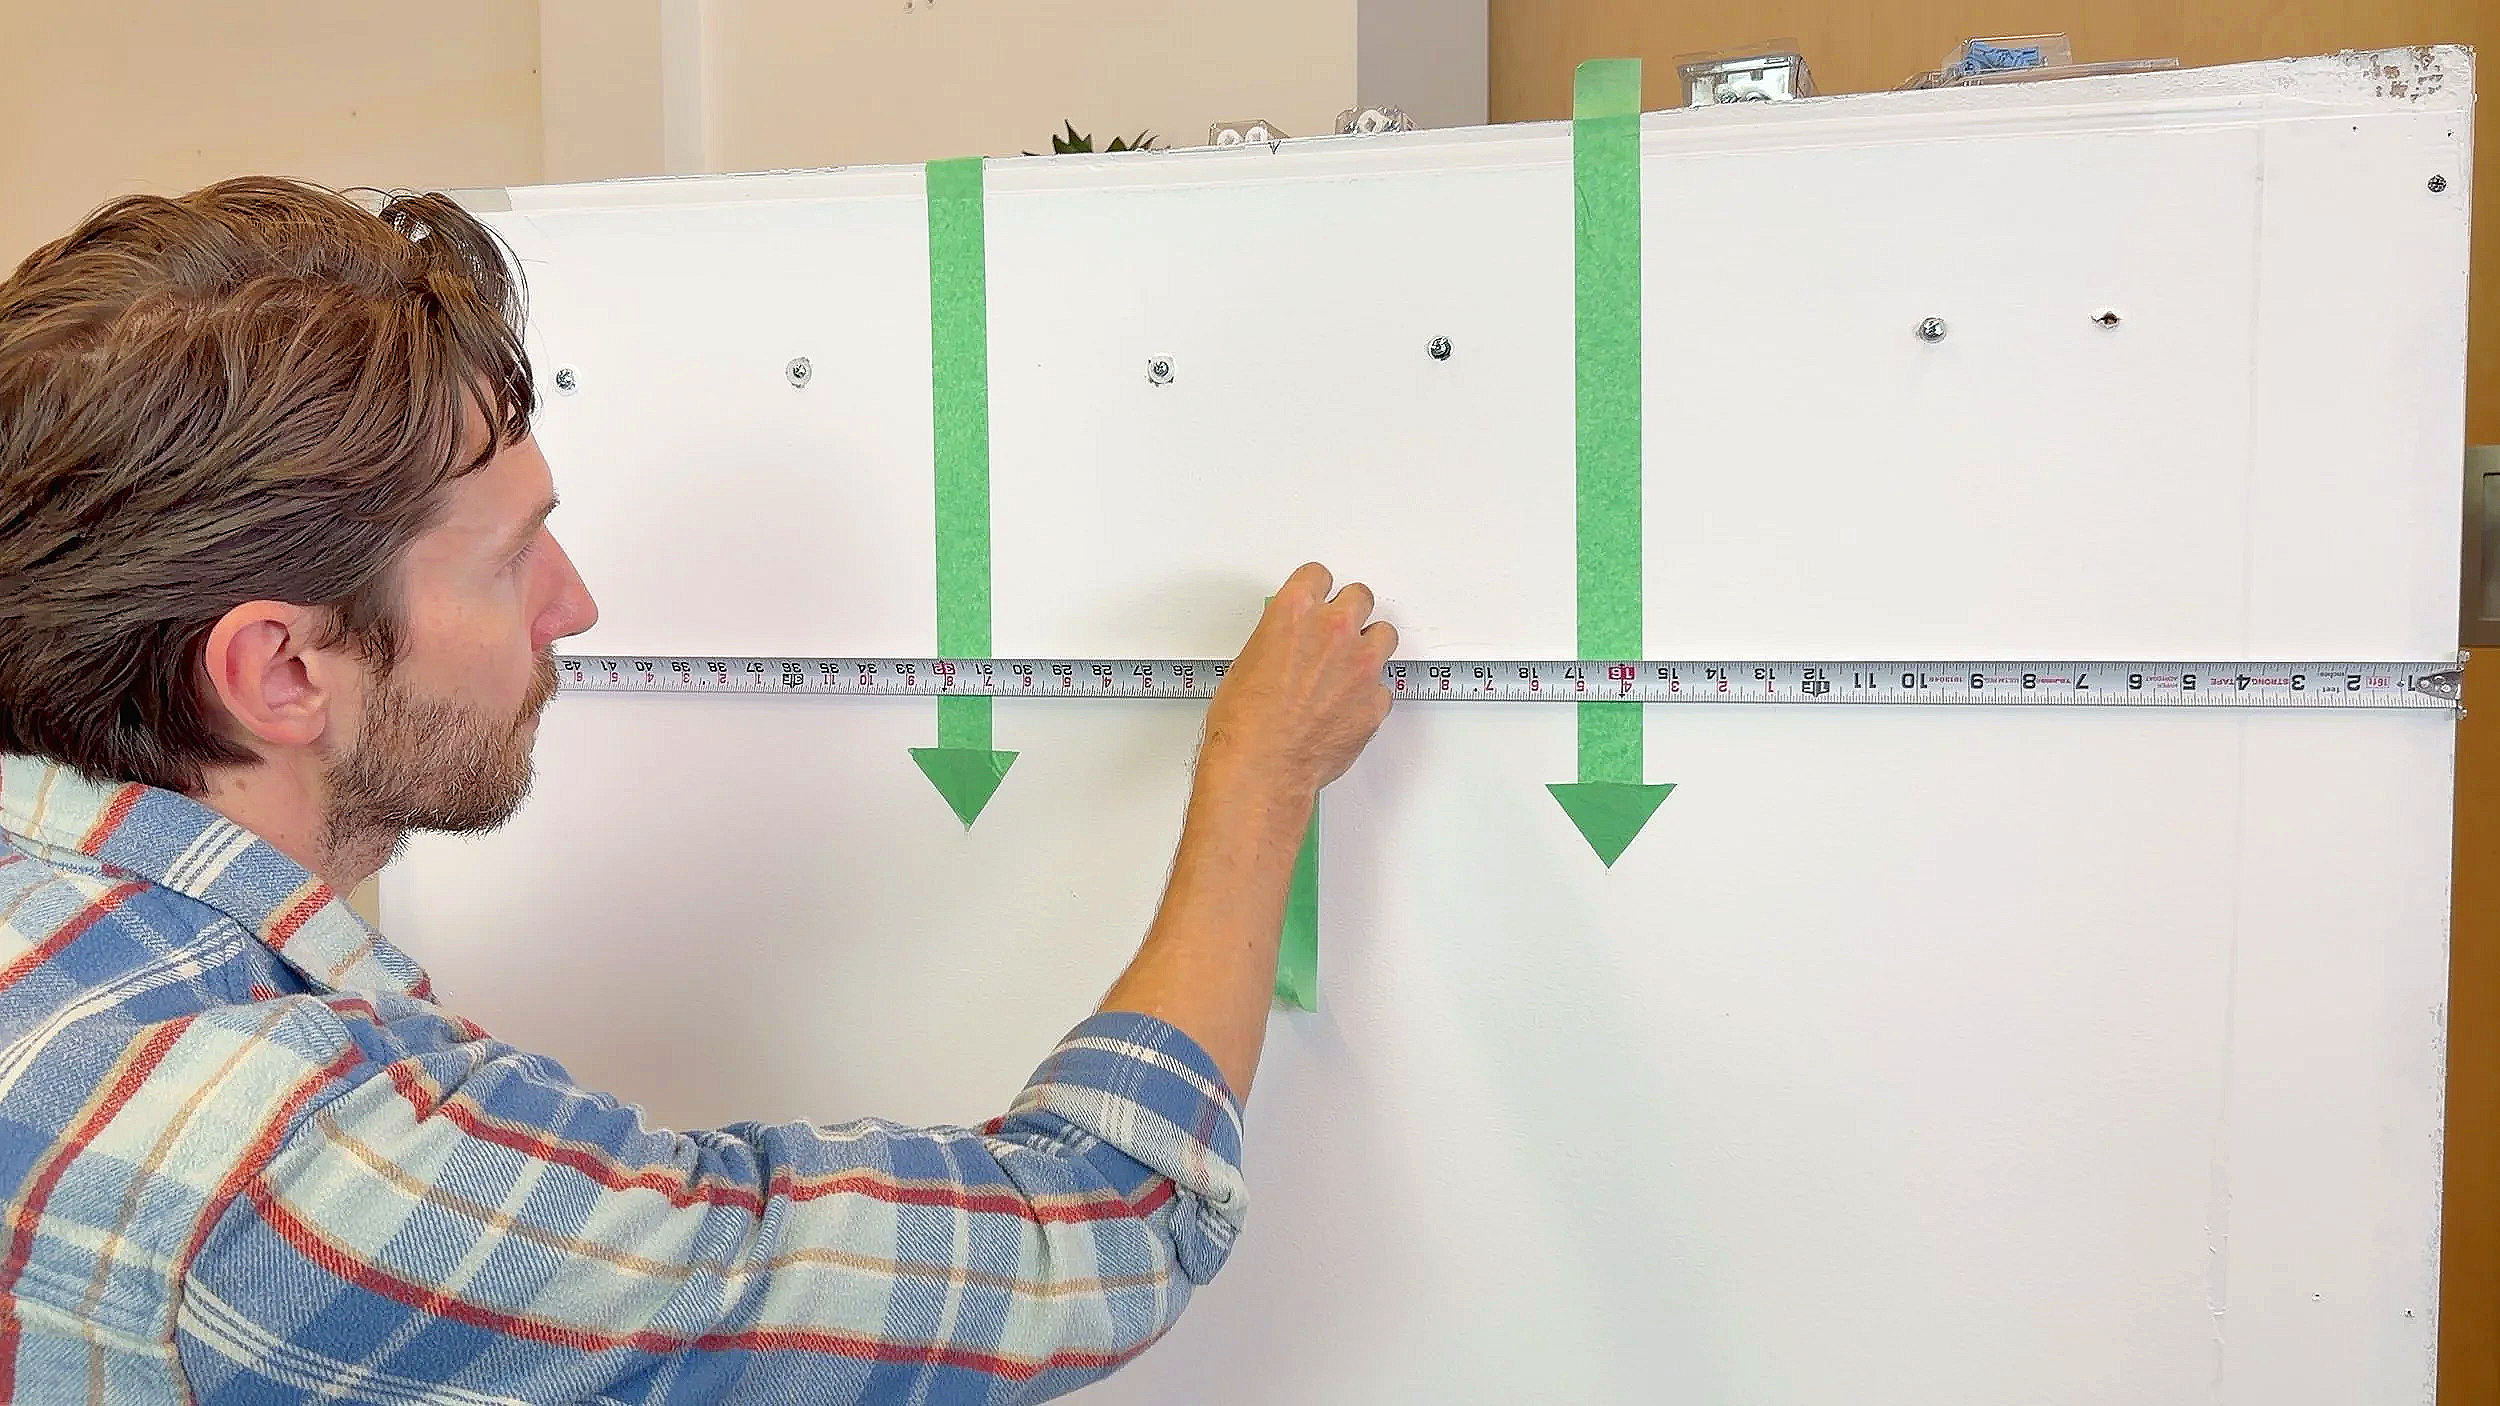
Use tape so you’re not drawing all over the wall.
Find the wall center (example in video: 48" wall → center at 24")
Mark desired shelf height (example shown at 36")
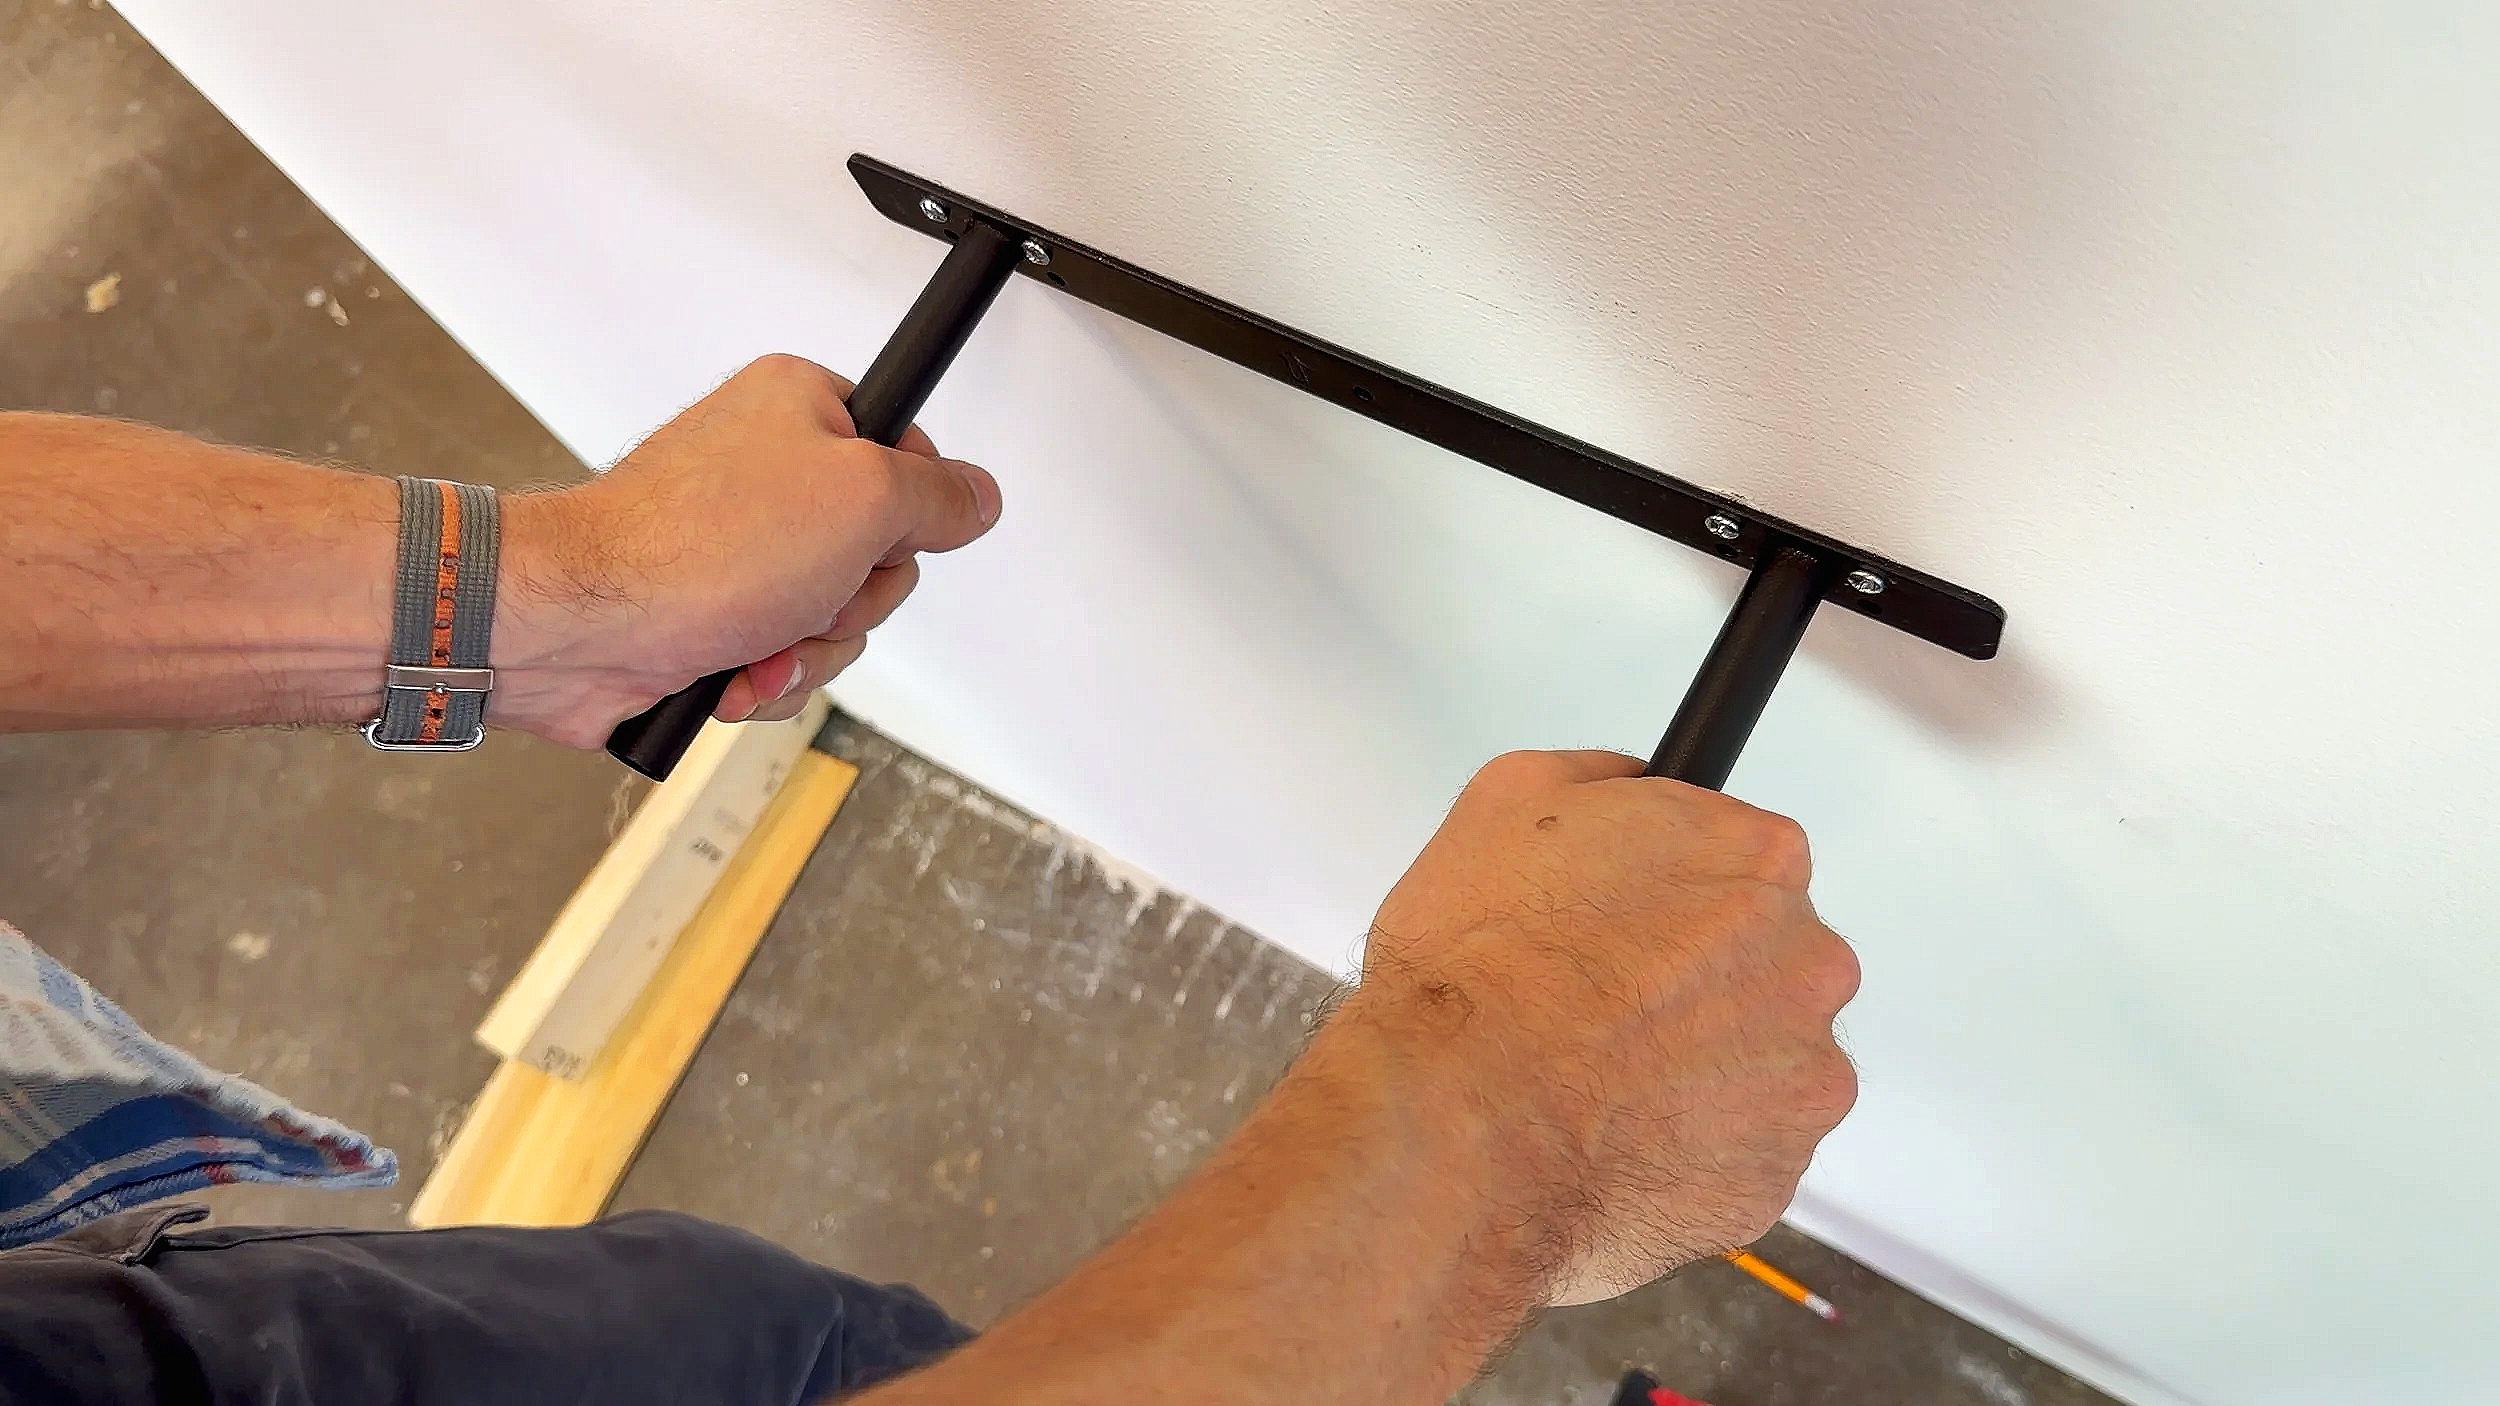
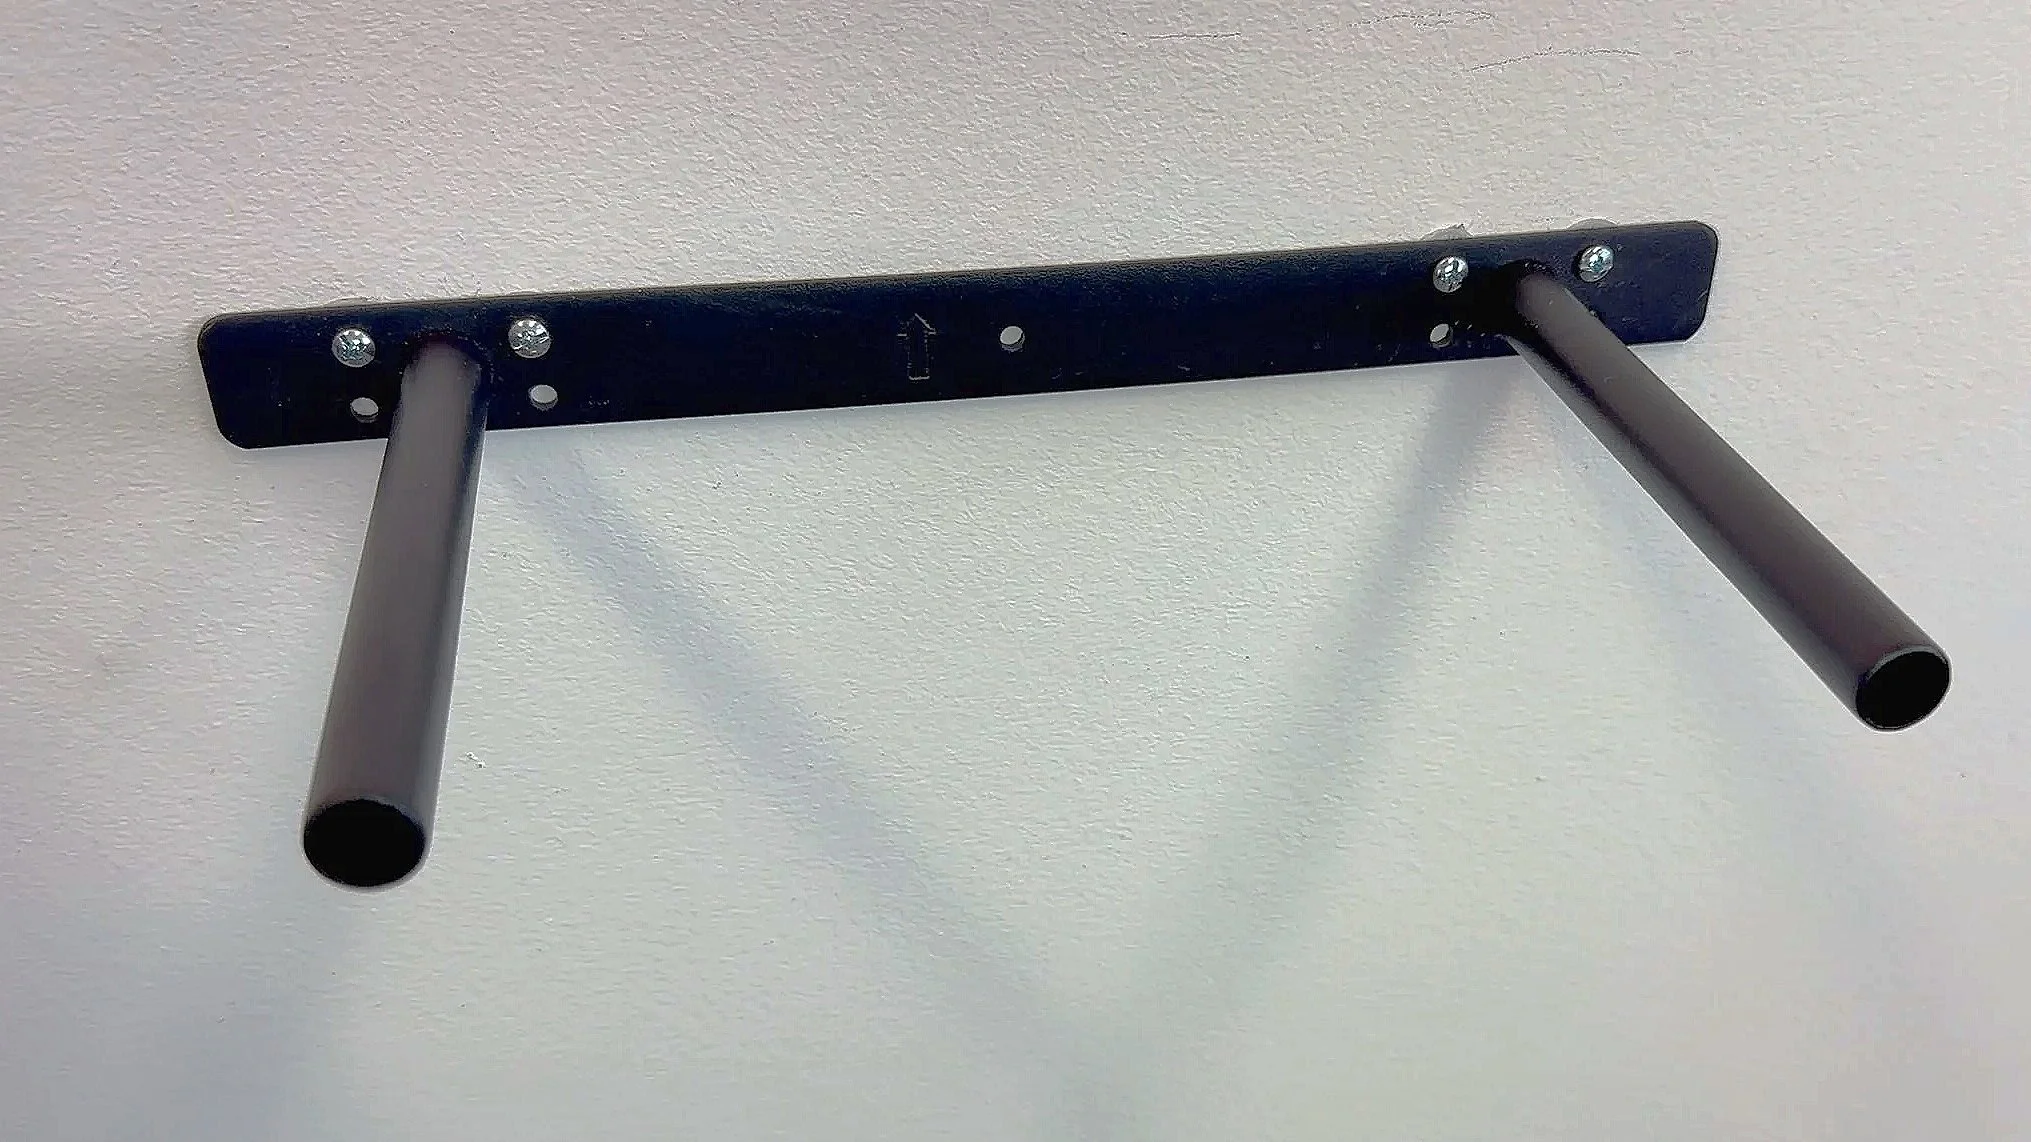
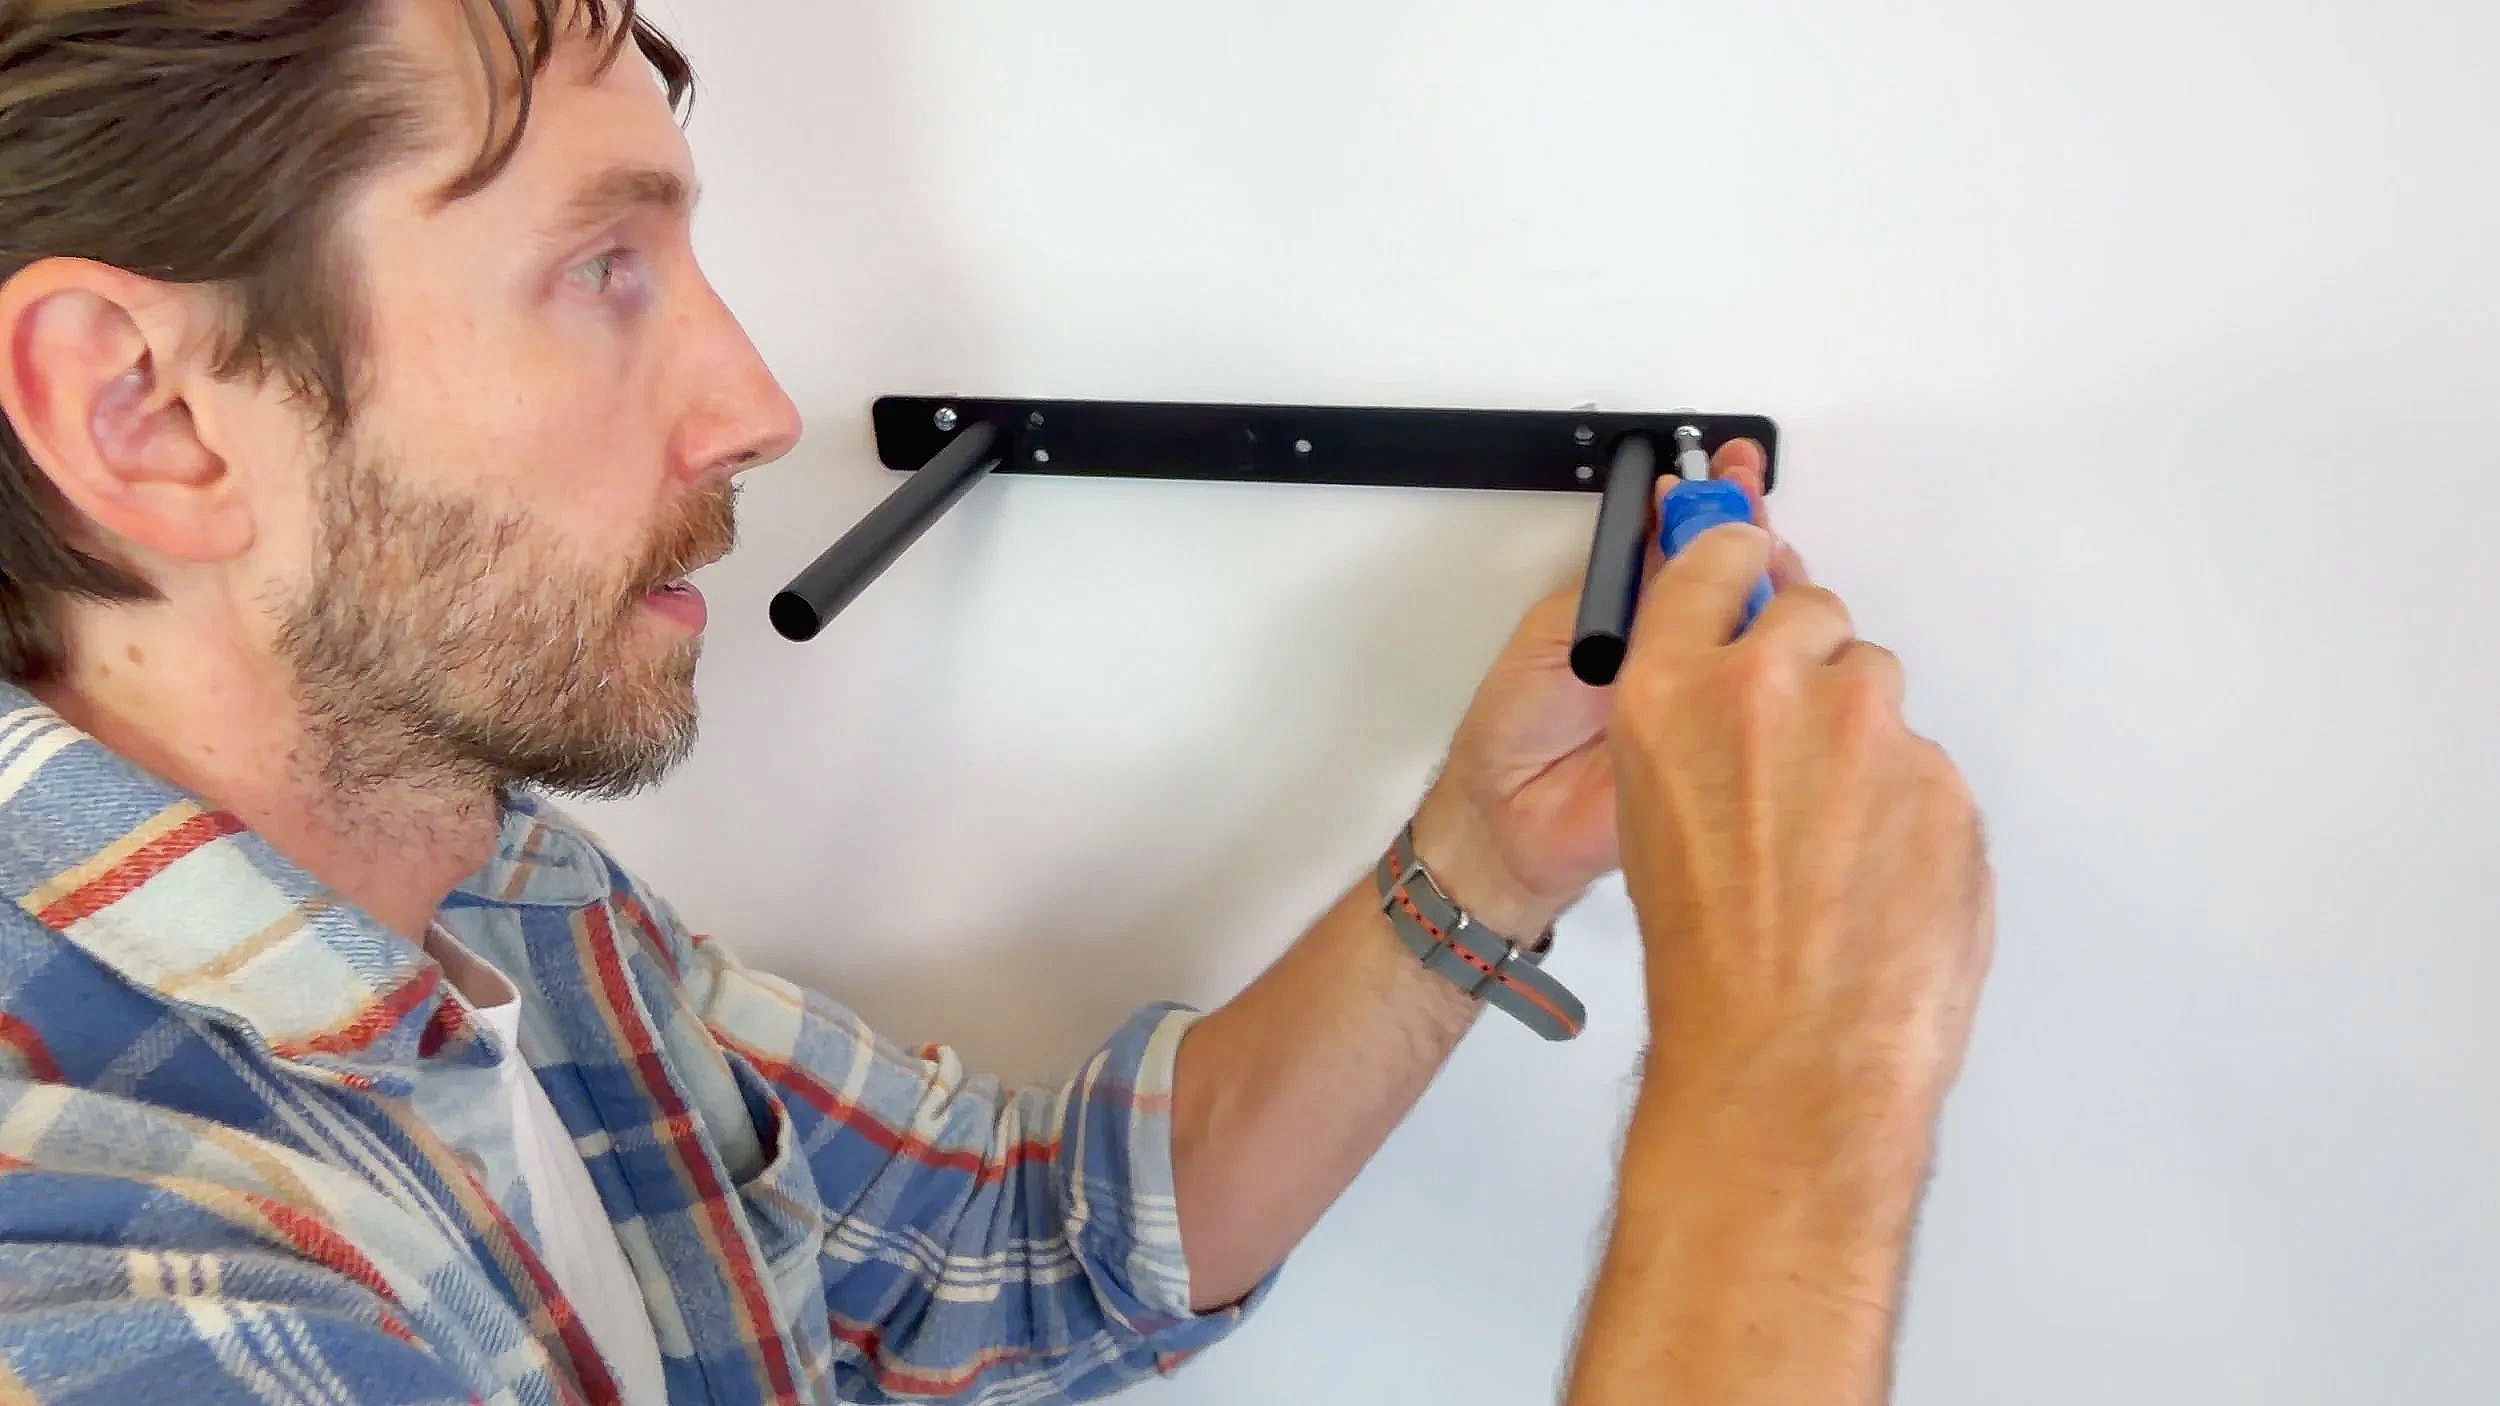
Step 2: Hold bracket, level it, and mark hole locations
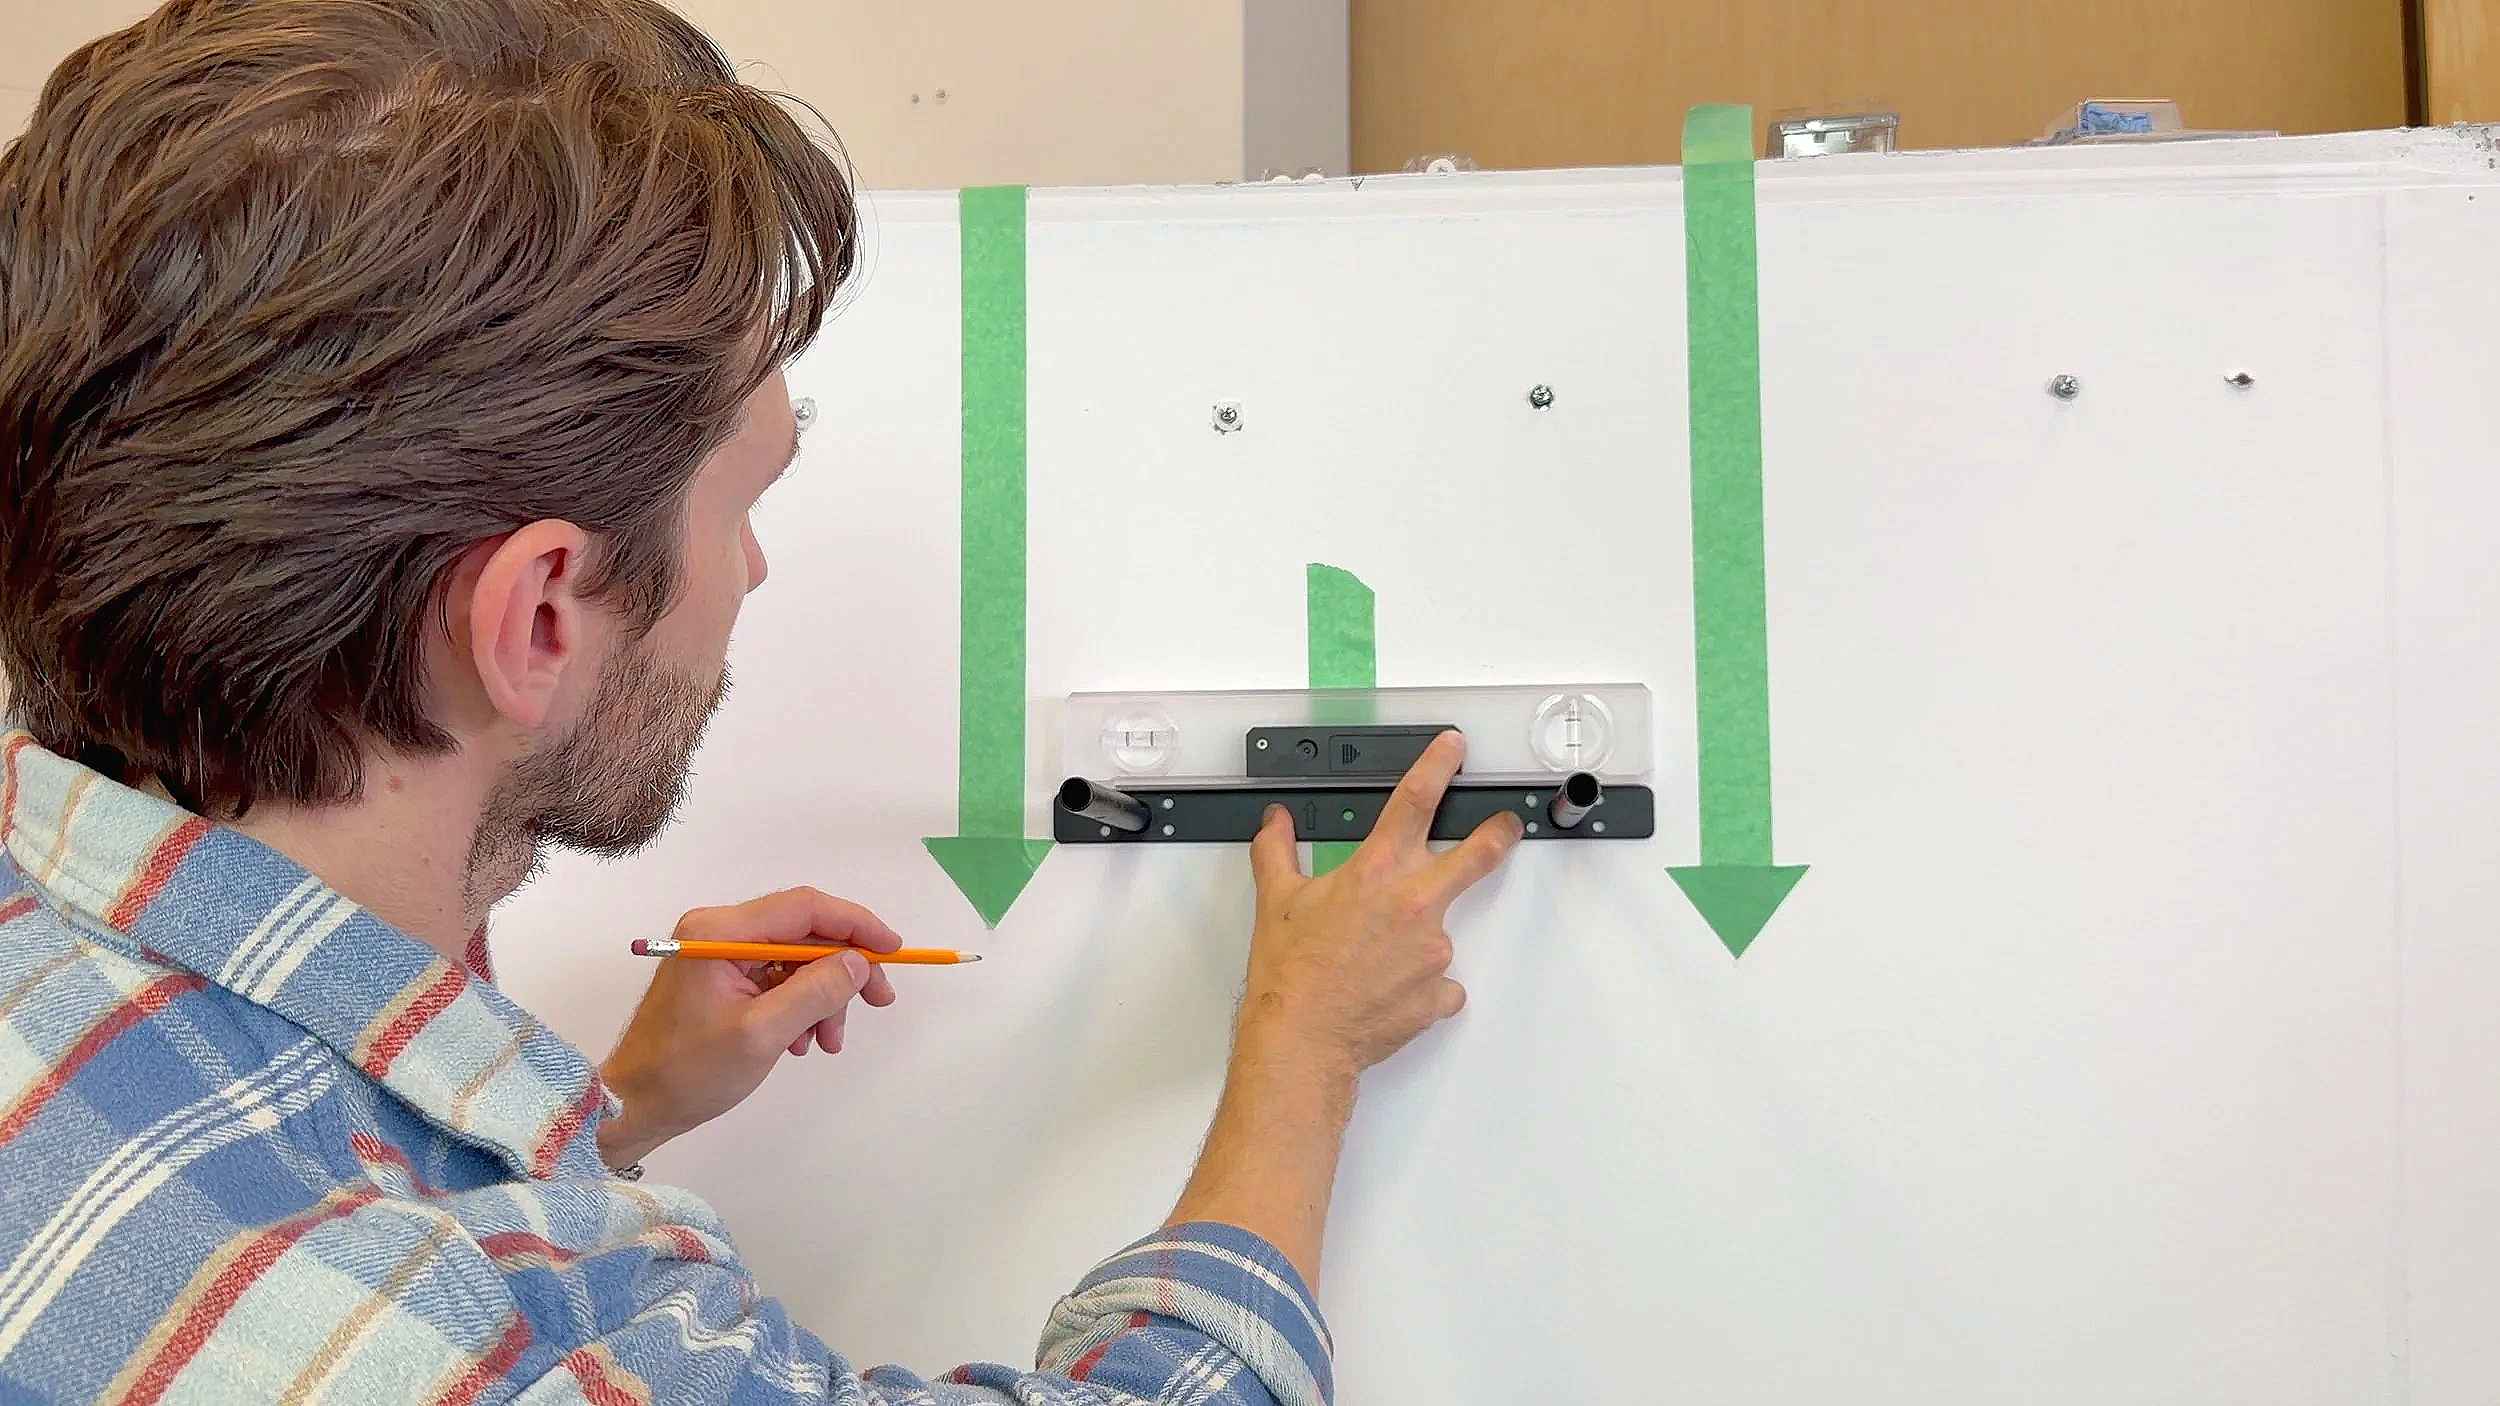
Most floating shelf brackets have a helpful center reference. Simply create your own if not.
Align the bracket with your center/height marks
Level it
Mark the holes you’ll actually use (many brackets specify which holes)
Step 3: Pre-drill for accuracy (even if using “self-drilling” anchors)
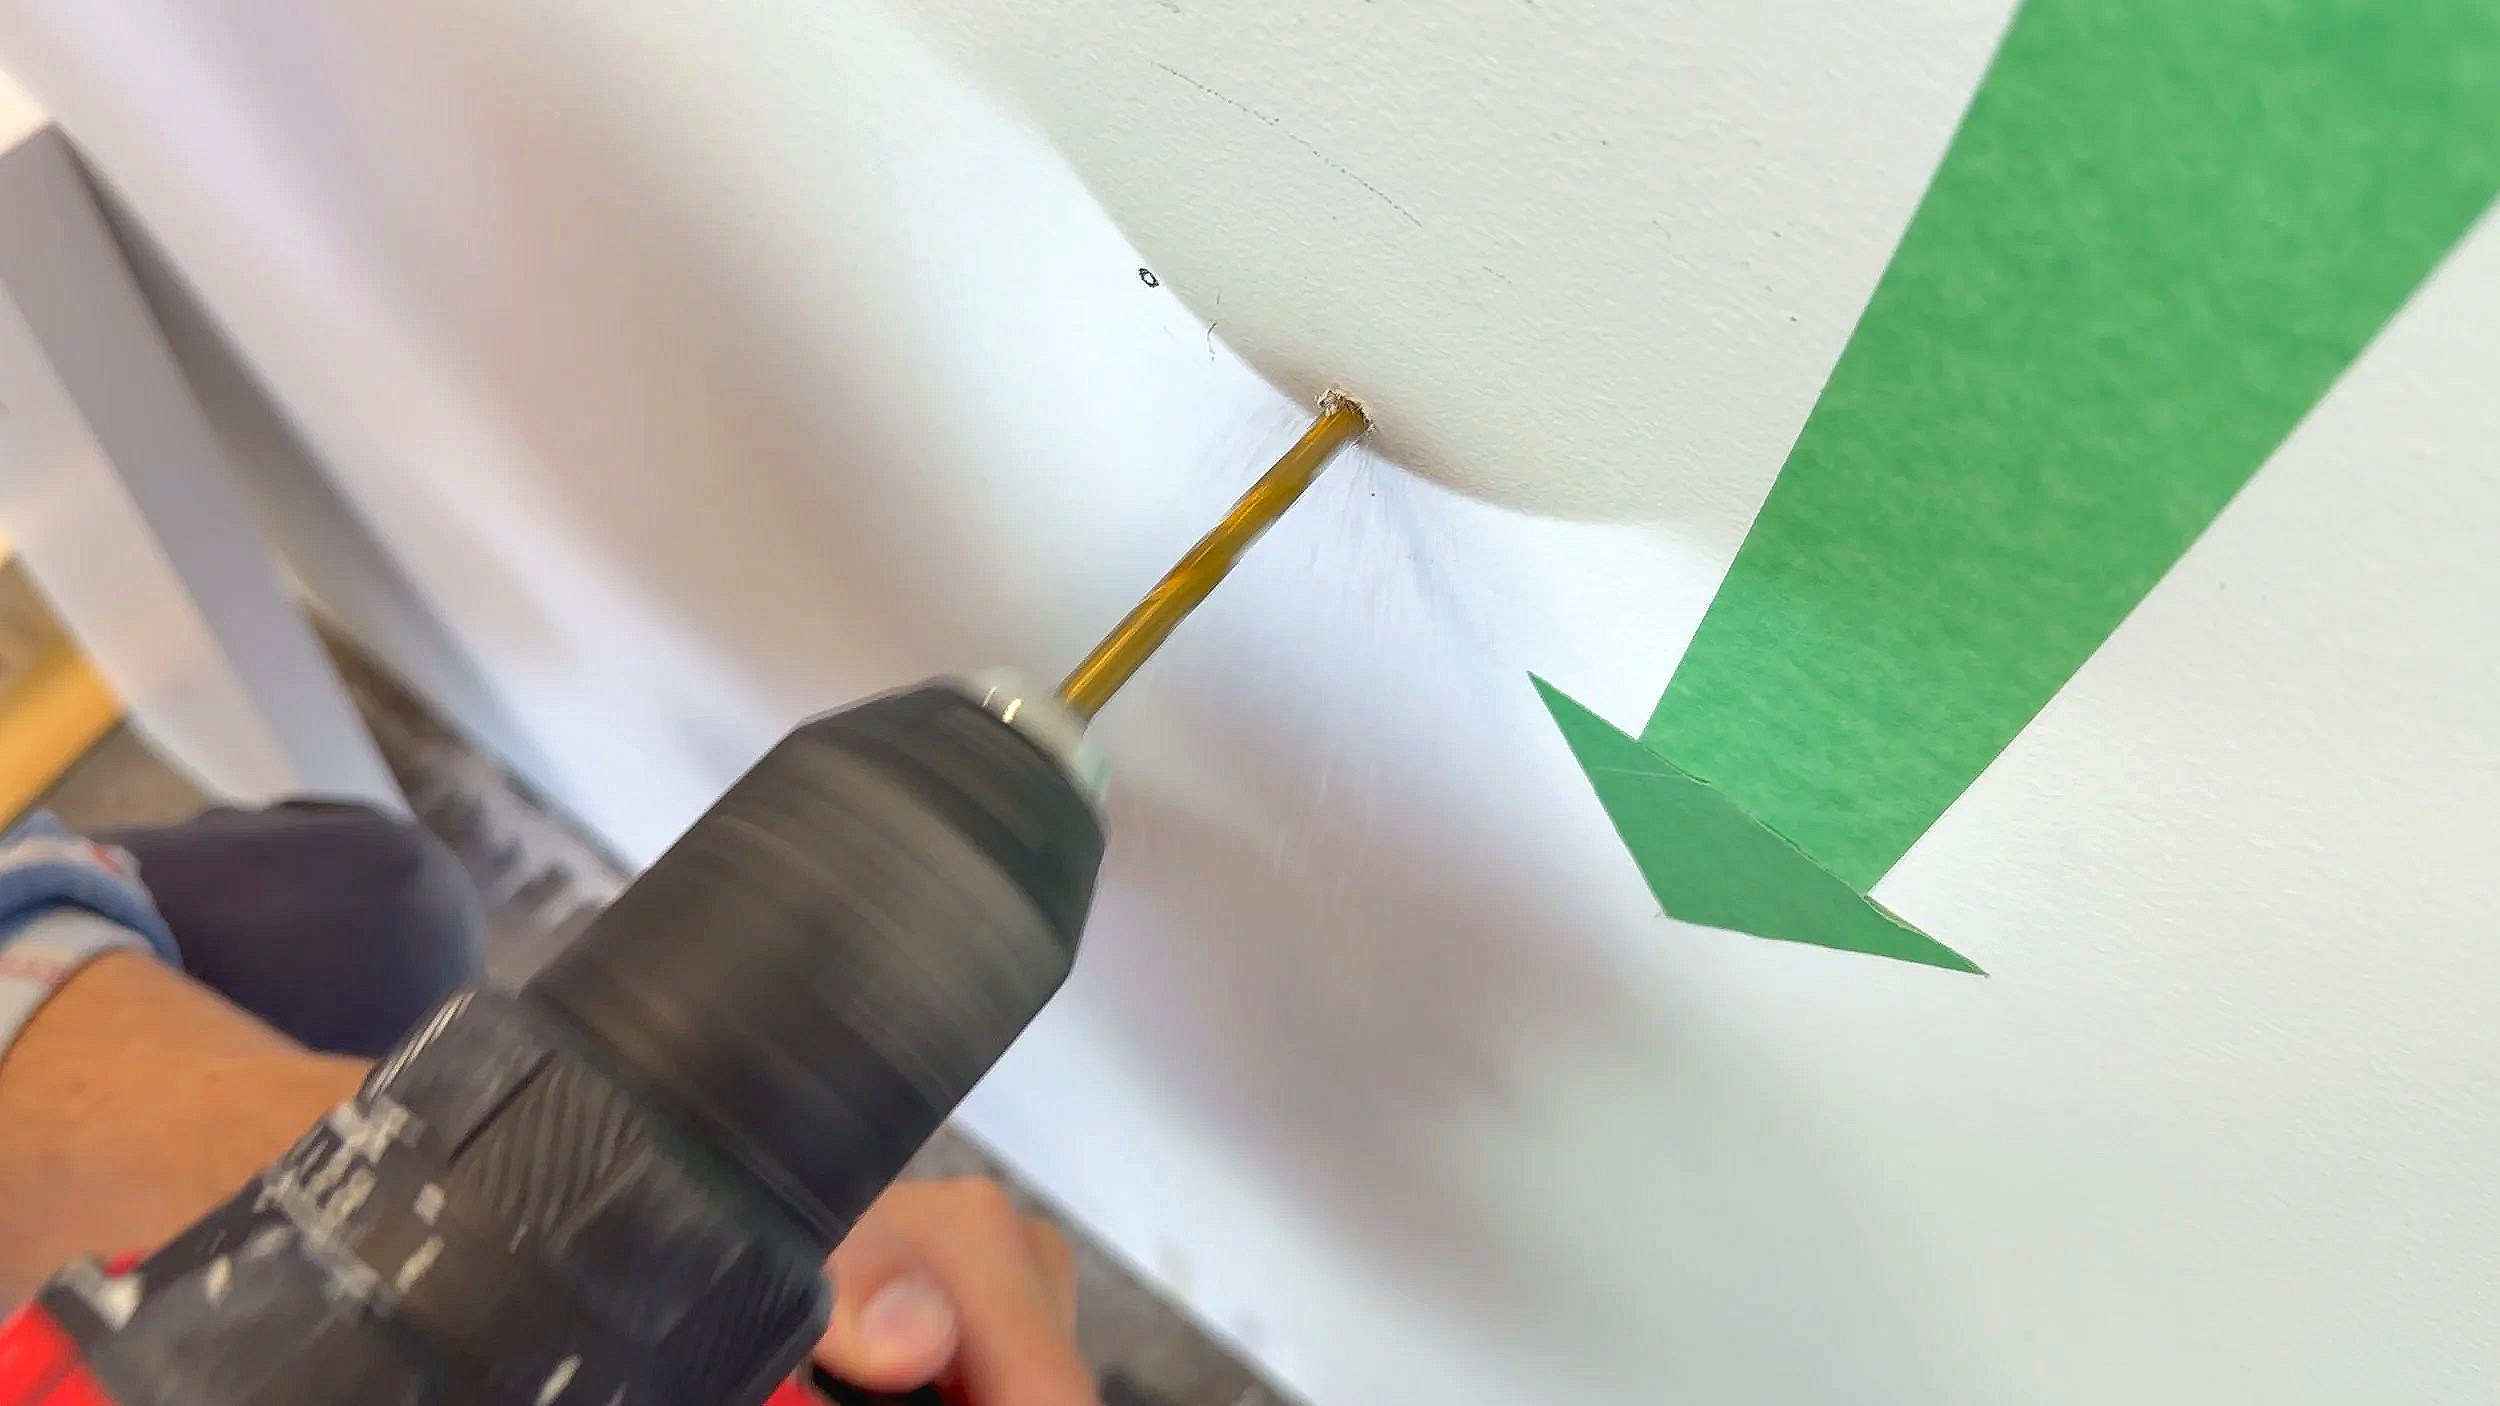
Self-drilling anchors can wander slightly while starting. If you need your holes exact, pre-drill a small starter hole first.
Step 4: Follow the anchor package directions (especially drill vs. hand drive)
Some anchors specifically recommend a manual screwdriver. It’s slower, but you get:
better control
less chance of shredding the drywall
more accurate seating
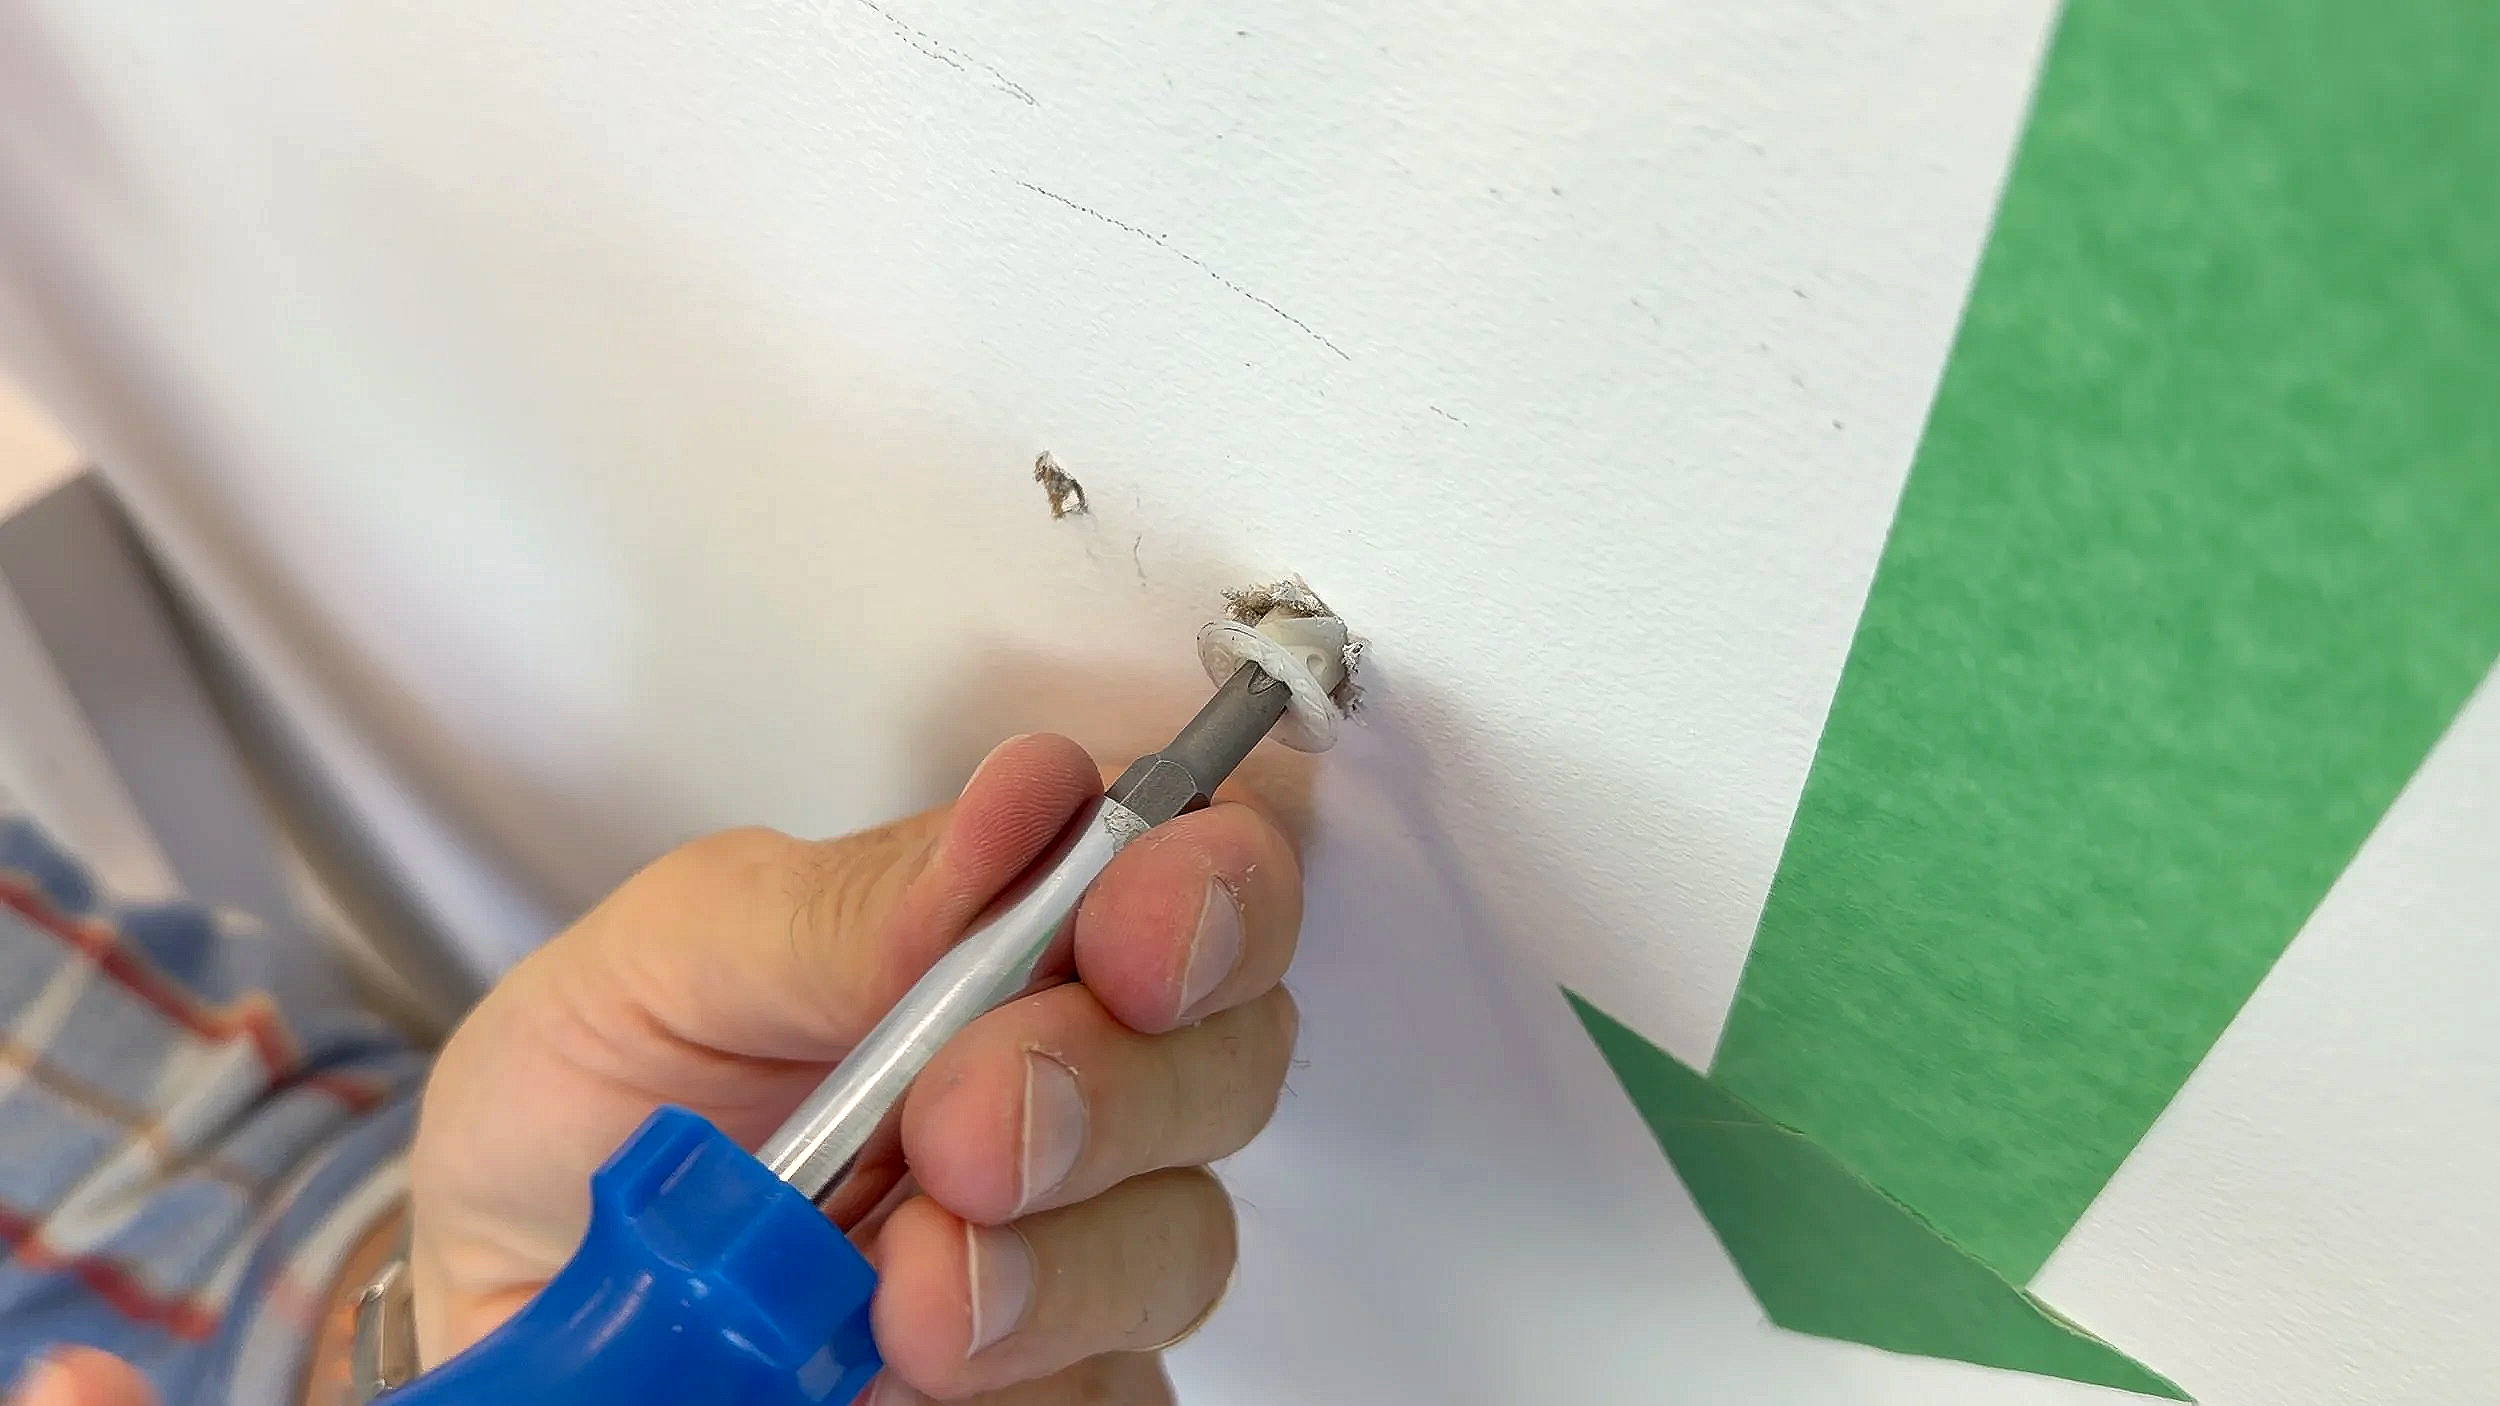
Step 5: Clear drywall debris so the anchor sits flush
Dust and debris can keep the anchor from sitting flat. This can be an issue if what you’re mounting needs to sit flat and flush against the wall (like our floating shelf). Remember, you’re screwing into the anchor- not the wall.
Quick fix: back it out, clear debris, then re-seat the anchor.
Step 6: Install all anchors, then mount the bracket
Start screws, but don’t fully tighten immediately.
Step 7: Level check (again), then tighten until the anchor engages
Before everything locks in, use your level one last time. Then tighten.
Important: some anchors don’t feel like they’re “working” until the final turns—this is when the anchor finally clamps and bites hard.
Step 8: Install the shelf and test sensibly
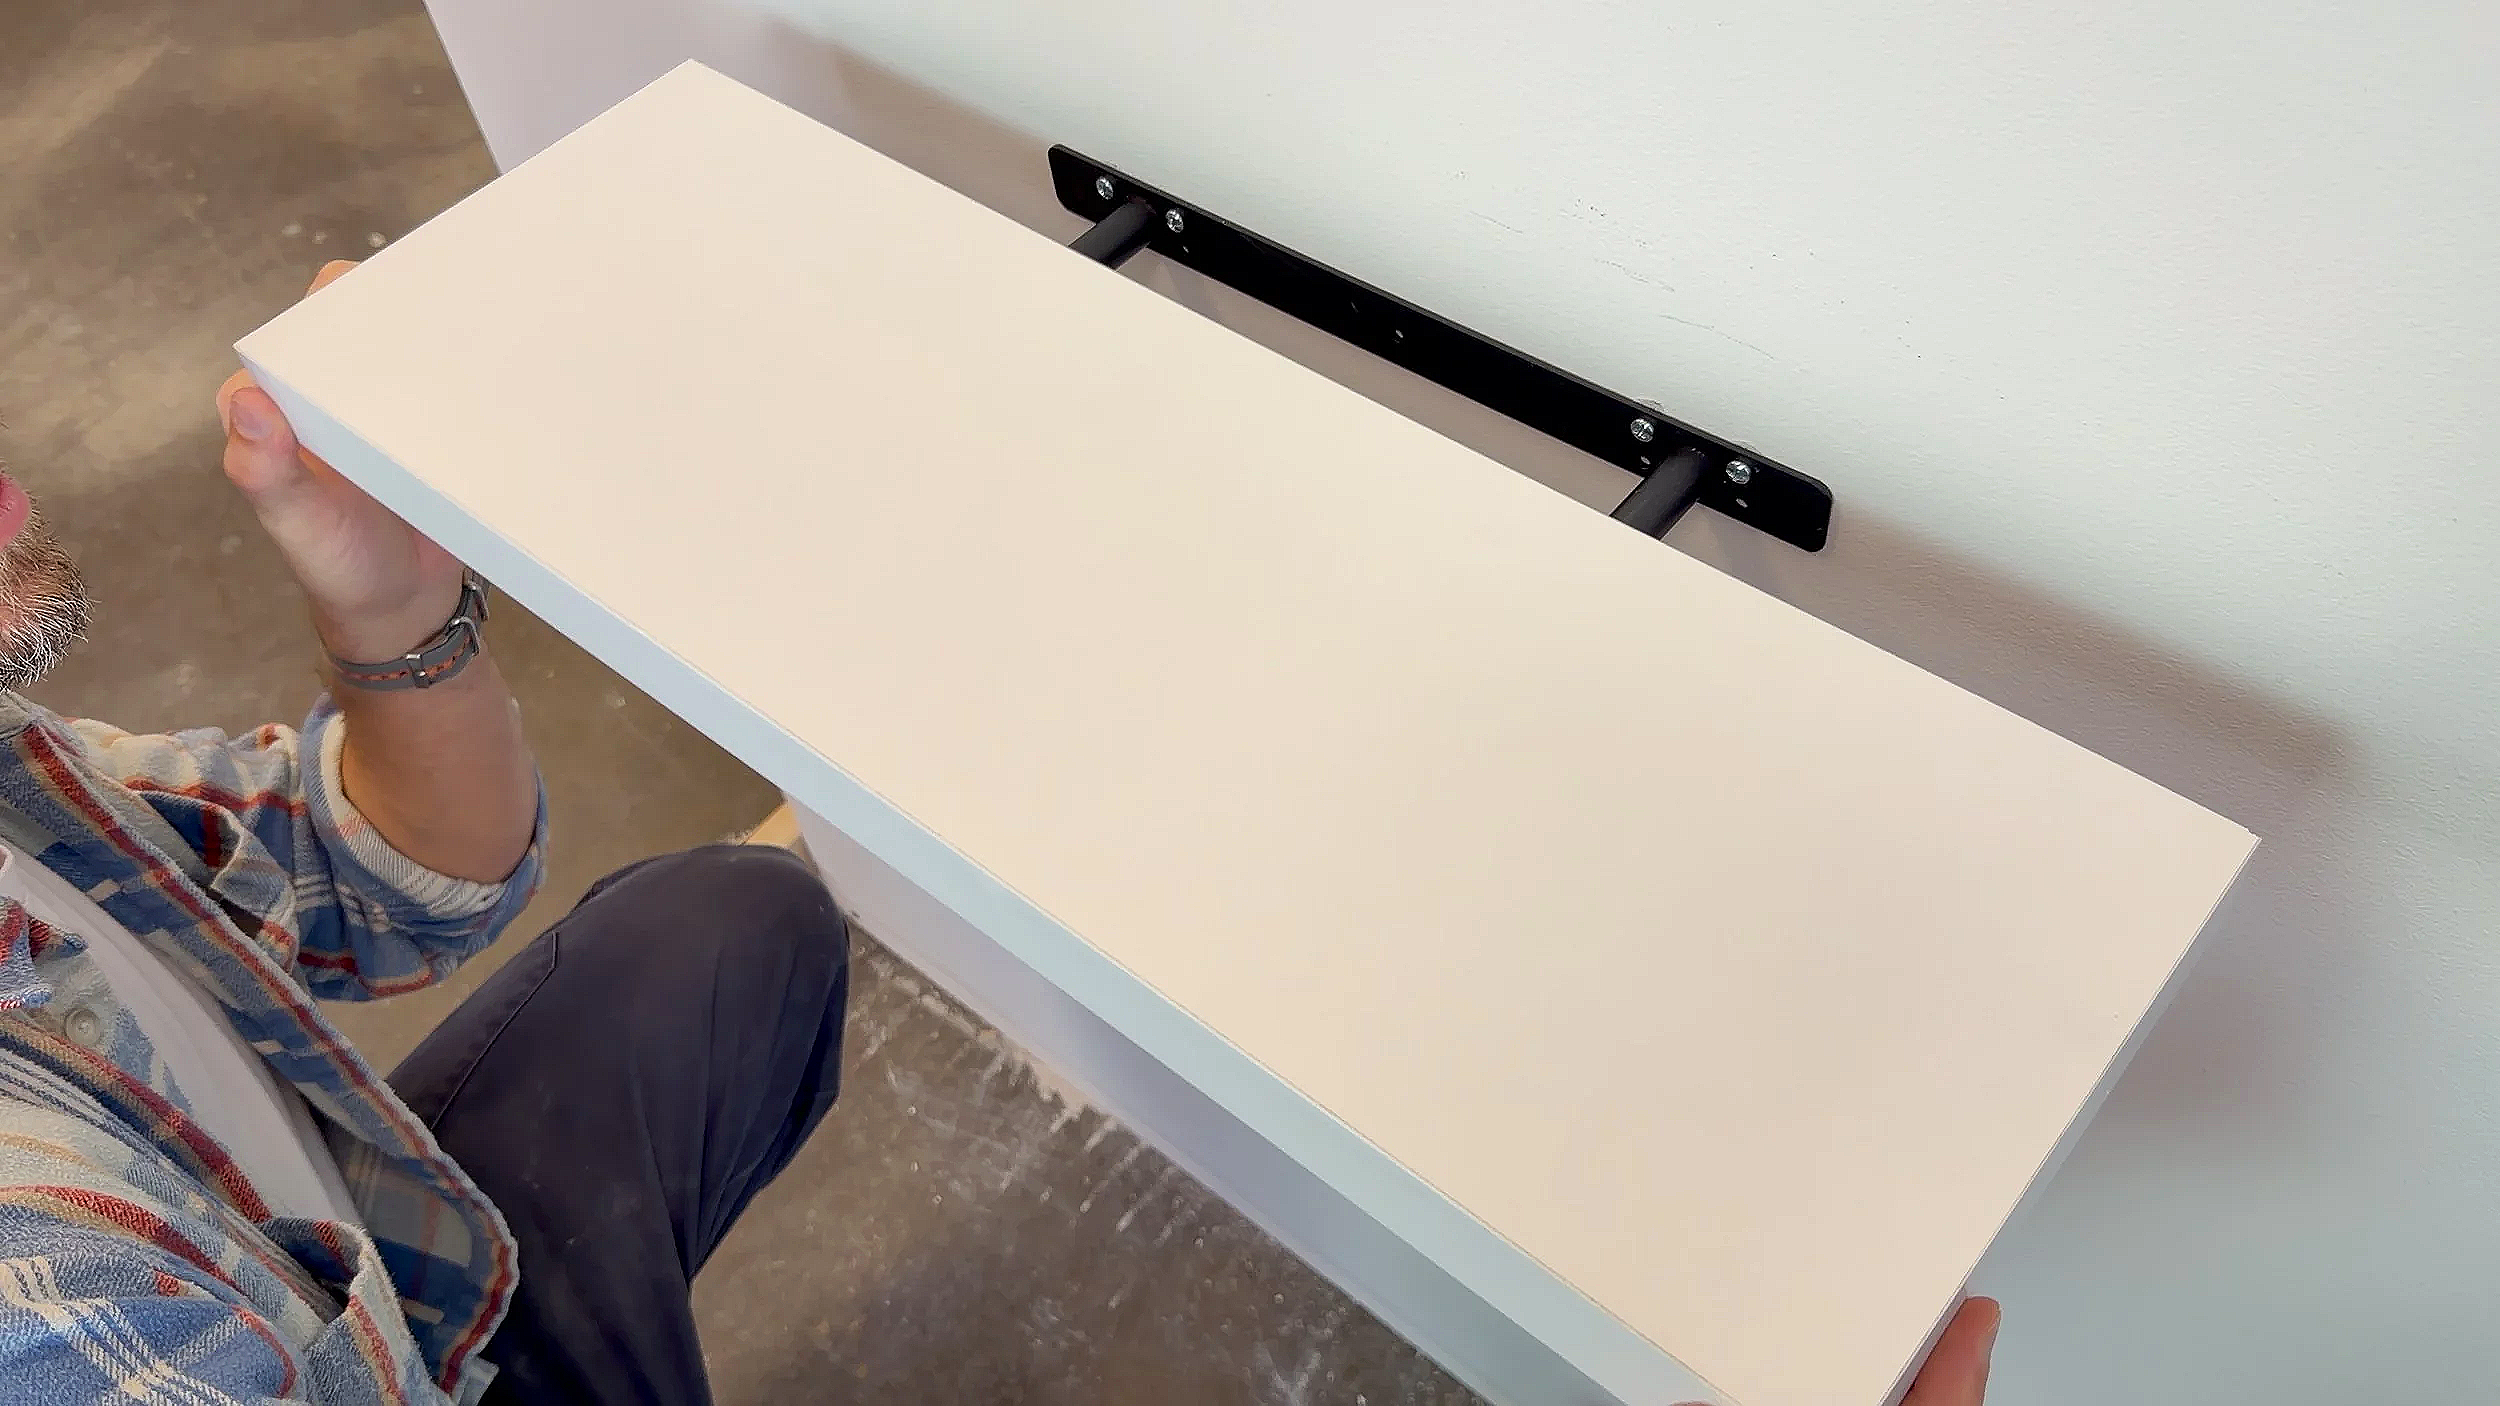
Once bracket is solid, slide/install the floating shelf and test gradually.
Quick FAQ (Common Google Questions)
Can drywall anchors hold a floating shelf?
Yes— but with a caveat. It depends greatly on the weight of the shelf, and the load you plan to support. Use your judgement, and select the right anchor type (often medium or heavy-duty) and install it correctly.
What’s the best drywall anchor for floating shelves?
Usually a toggle-style heavy-duty anchor that fits your bracket holes, or a strong medium-duty expanding anchor for lighter shelves. Always overestimate the load that the anchors will be supporting. Better safe than sorry.
Do I need to hit a stud for a shelf?
Not necessarily- but studs are always best for heavy shelves. When studs don’t line up, use backing or the correct hollow-wall anchors.
The Takeaway: Choose Strong + Install Correctly

You don’t need studs for every project—but you do need the right anchor and technique.
Remember:
Skip cheap plastic anchors for anything heavy
Medium-duty anchors are great for many stationary loads
Toggle-style heavy-duty anchors give the best drywall strength (if they fit your bracket)
Pre-drilling, dust cleanup, and proper tightening make a huge difference
Big thanks to Rona for sponsoring the tutorial and supporting DIY creators. If you want to see the anchor types in action (and what happens when the wrong ones fail), check out the full video on the Refresh Home Improvements YouTube channel.